
Microphones: Triangulating Goldilocks
In the eleventh installment of this on-going series, Greg Simmons defines the Goldilocks Zone for a preamplifier, and shows how to choose microphones that are just right for it.
In the previous installment we looked at some recommended level guidelines for capturing microphone signals that were intended to be mixed together, either as a multitrack recording or a live performance. We also looked at some different approaches to microphone preamplifier design and how each one affects the preamplifier’s capabilities and/or performance. The previous installment finished with a promise of how to define the Goldilocks Zone, which we’re going to do now…
DEFINING GOLDILOCKS
How does all of the information in the previous installments help us to define the Goldilocks Zone? It’s all about choosing a microphone with the right Sensitivity for the sound source so that we can reach the Target Level of -20dBFS Average (as per the recommendations in the previous installment) without introducing more noise than necessary when using low Sensitivity passive microphones, and without risking distortion when using high Sensitivity active microphones.
Let’s define some limits. To maintain consistency we’ll continue using the analogue NOL of +4dBu and a corresponding digital Alignment Level of -20dBFS, and we’ll stick to the EIN curve of the simple microphone preamplifier we’ve used in earlier installments.
Lower Limit Of Goldilocks Zone
From a preamplifier noise point of view it can be argued that the higher the microphone’s Sensitivity the better, because it provides a healthier signal that requires less gain. However, if the microphone’s Sensitivity is too high the resulting signal will require less gain than the preamplifier’s minimum gain, potentially resulting in clipping distortion – depending on the signal’s waveform and the Peak levels it creates coming out of the microphone.
If you’re using an affordable padless preamp it’s a safe assumption that its minimum gain will be around +10dB, as we saw in the previous installment. That’s also a good minimum gain to aim for (it represents a very small amplification of x3.162, which leaves room to breathe), so let’s set +10dB as the minimum gain for the Goldilocks Zone.
Upper Limit Of Goldilocks Zone
Now we need to define an upper limit for the Goldilocks Zone – which is the amount of gain where noise becomes excessive or, more to the point, obtrusive. As stated earlier in this series, “noise is only a problem if it’s loud enough to be a problem…”
In the seventh installment of this series we looked at the EIN curve of what was described as ‘a simple microphone preamplifier’, measured with a source impedance of 150 ohms. That EIN curve dates back to at least 2010 so it’s safe to assume it represents a ‘worst case’ scenario by today’s standards, but it’s also a good example because its gain/noise relationship is more exaggerated than contemporary designs and therefore better for demonstration purposes. Here it is again, with some preamplifier noise calculations added in…
It’s all about choosing a microphone with the right Sensitivity for the sound source…

When we know how to interpret the EIN curve correctly (as explained in the seventh installment of this series), we see that the noise appearing at the output of the preamplifier increases with the amount of gain – but that’s not the whole story. As we increase the gain the level of noise at the preamplifier’s output increases by a certain amount (as shown in the EIN curve), but the level of the signal at the preamplifier’s output increases by a larger amount. This leads to a lot of confusing information in text books and on-line regarding the relationship between preamplifier gain and preamplifier noise. We’ll explore and clarify this confusion in the next installment; for now, let’s stick to traditional measurements.
If we measure the noise at the preamplifier’s output and compare it against an industry-standard output signal level of +4dBu, we see that the preamplifier’s S/N Ratio deteriorates with increasing gain. In other words, when compared against a defined reference value (as all reputable specifications are) we see that increasing the gain also increases the level of noise at the preamplifier’s output; as shown in the graph below, based on the figures in the EIN curve above. As the gain increases by 50dB, from +10dB to +60dB, the noise at the preamplifier’s output increases by 26dB, from -95dBu to -69dBu. Correspondingly the preamplifier’s S/N Ratio decreases by 26dB, from 99dB to 73dB.

Clearly, increasing the preamplifier’s gain reduces its S/N Ratio and contributes more noise to the signal path. Whether that noise is ultimately a problem in the finished mix, and how to reduce it further, is something we’ll look at in the next installment. Our goal for now is to determine an upper limit for the gain so that we can determine the right Sensitivity for the microphone.
In a situation where many channels are being mixed together and noise accumulates, we want to keep each channel quiet enough for the noise to be unobtrusive while simultaneously retaining Headroom, avoiding clipping and not overdriving dynamic processors. It’s always going to be a compromise between noise and Headroom, because a good signal requires sufficiently high Headroom and sufficiently low noise – maximising one means minimising the other (we’ll see how to do that in the next installment). The old-school audio engineers and equipment designers understood this basic noise/headroom dichotomy, which is why they developed the concept of a Nominal Operating Level (NOL) – and they were dealing with analogue tape, which is far noisier than any contemporary digital signal. Their NOL concept obviously worked in that much noisier situation, so it should have no problem working in contemporary digital systems where noise is considerably lower throughout the entire process – from recording to streaming.
Our goal is to avoid obsessing about getting the noise down as low as possible, and focus instead on getting it down to a level that is not obtrusive. With that in mind, to determine an upper limit for the Goldilocks Zone means we need to determine how much noise we consider to be unacceptable. For the sake of this discussion, let’s say we wanted to keep the preamplifier’s noise contribution per channel lower than the theoretical noise limit of a 16-bit release medium such as Compact Disc, which is -96dBFS.
Earlier we chose +10dB as the Goldilocks Zone’s lower limit, to minimise the chances of clipping distortion due to overloading the preamplifier’s input circuit or other devices further in the signal path. According to the EIN curve we’re using as a reference, at +10dB of gain the preamplifier’s noise is -95dBu, which is 99dB lower than the NOL of +4dBu [i.e. +4 – 95 = 99]. If our digital equipment is aligned so that +4dBu = -20dBFS then the preamplifier’s noise level will be 99dB below -20dBFS, which is -119dBFS. That’s well beneath our required theoretical noise floor of -96dBFS, but comfortably fits into the 144dB Dynamic Range offered by a 24-bit word size.
A noise level of -96dBFS in our digital signal corresponds to a noise level of -72dBu at the output of the preamplifier (assuming -20dBFS = +4dBu). According to the EIN curve of the particular preamplifier that we’ve been referencing throughout this series, -72dBu of noise occurs somewhere between +50dB and +60dB. What gain should we use as the upper limit for the Goldilocks Zone? A good way to think about this is to consider the cumulative effect, i.e. how much does the noise increase when many channels are added together, as they would be in a mix.
What happens at +50dB of gain? According to the EIN curve we’ve been referencing, at +50dB the preamplifier’s noise is -77dBu. That’s 81dB below the NOL of +4dBu [+4 – 77 = 81], and is equivalent to -101dBFS in a digital system that’s been aligned so that +4dBu = -20dBFS. It’s 5dB quieter than the theoretical best that CD can do. Considering that the noise will increase by 3dB for every doubling of channels, here’s how the preamplifier noise would accumulate with more channels of the same preamplifier at +50dB of gain (assuming all channels were simply summed together at unity gain with no EQ or other processing):
…we need to determine how much noise we consider to be unacceptable.

Even with 64 channels, the total noise contribution to the mix from the preamplifiers comes in at -83dBFS. That’s not including Self Noise from active microphones, thermal noise from other electronic sound sources or processors, or the general acoustic background noise captured by every microphone being used. Good luck identifying that -83dBFS of preamplifier noise in a mix containing 64 signals happening simultaneously and being heard in any normal listening environment at any normal playback level…
Can we go higher than +50dB with this particular preamplifier? At +60dB of gain the preamplifier’s noise is -69dBu, which is 73dB below the NOL of +4dBu and therefore equivalent to -93dBFS in a digital system that’s aligned so that +4dBu = -20dBFS. It’s 3dB noisier than the theoretical best that CD can do, which is beyond the limit we decided upon earlier for a single channel but is probably acceptable on a few channels within a complete mix. (If you’re using +60dB of gain on more than a few channels of a mix then you’re probably choosing the wrong microphones for the job and need to go back to the Sensitivity installment.)
With this information in mind we can safely set the upper gain limit of the Goldilocks Zone for this particular preamplifier to +50dB, knowing we can go as high as +60dB for some channels if necessary without any significant noise penalty on a finished mix consisting of a dozen or more channels.

The illustration above is an updated version of the gain control image that’s been used throughout this series, with the Goldilocks Zone (gold) now indicated as between +10dB and +50dB of gain. As explained earlier, the +10dB figure was based on the minimum gain offered by many padless preamplifiers and also on interfaces that use preamp-on-a-chip designs. The +50dB figure was based on a maximum acceptable noise level from the preamplifier that was chosen to be equivalent to -96dBFS, based on the EIN curve reproduced earlier and assuming a NOL of +4dBu and an Alignment Level of -20dBFS (in accordance with the RP-155 recommendation). You could probably take that gain level higher with any contemporary preamplifier design, but +10dB to +50dB is a good window to aim for in any case. Whenever you’re using more than +50dB of gain it’s worth re-assessing your microphone choice – it doesn’t mean you’re using the wrong microphone (perhaps you really want the tonality of that passive ribbon and you’re happy to live with the extra noise), but it should always provide cause to reflect on your choices.
The illustration below shows how those settings align with the coloured markings around the gain control:

If we need less than +10dB of gain (grey area) it’s possible that our chosen microphone has higher Sensitivity than necessary and could cause clipping on peaks. It’s probably the wrong microphone for the job and should be replaced with a lower Sensitivity microphone – especially if any pads on the microphone or preamplifier have already been switched in and the signal is still too high.
If we need more than +50dB of gain (red area) it’s possible that our chosen microphone has lower Sensitivity than necessary, giving the signal a poor S/N Ratio to start with and thereby risking more noise than necessary. It’s probably the wrong microphone for the job and should be replaced. If using an active microphone it could be replaced by a microphone with a) higher Sensitivity and the same Self Noise, b) the same Sensitivity but lower Self Noise, or c) higher Sensitivity and lower Self Noise. Any of these changes will provide a microphone signal with a better S/N Ratio into the preamplifier, requiring either less gain or the same gain with less noise. If using a passive microphone it could be replaced by a microphone with a) higher Sensitivity and the same impedance, b) the same Sensitivity but a lower impedance, or c) higher Sensitivity and lower impedance. Option A provides a higher signal level into the preamplifier from the microphone, requiring less gain and therefore less noise from the preamplifier. Option B requires the same amount of gain but the lower microphone impedance means less thermal noise, resulting in less noise at the same gain. Option C combines A and B to get a quieter signal at lower gain.
GOLDIVOLTS
Our Goldilocks Zone’s minimum gain of +10dB represents an amplification of x3.16. A signal that requires an amplification of x3.16 will therefore have a voltage that is 10dB below the NOL of 1.228VRMS (i.e. +4dBu), which is 0.388VRMS. Here’s the maths:
Signal voltage for +10dB gain = 1.228/3.16 = 0.388VRMS
At the other extreme, the Goldilocks Zone’s maximum gain of +50dB represents an amplification of x316. A signal that requires an amplification of x316 will have a voltage that is 50dB below the NOL of 1.228VRMS, which is 0.00388VRMS. Here’s the maths:
Signal voltage for +50dB gain = 1.228/316 = 0.00388VRMS

So in this example, where the NOL is 1.228VRMS (+4dBu), our chosen gain range of +10dB to +50dB represents an input signal voltage range from 0.388VRMS to 0.00388VRMS.
TRIANGULATING LEVEL
In photography there is a concept called the ‘Exposure Triangle’, which is used to illustrate how three of the fundamental camera parameters – aperture, shutter speed and ISO – are used together to achieve the desired exposure (i.e. the amount of light that passes through the lens and onto the film or sensor). Each parameter affects the total amount of light captured in the image, but each also affects a different characteristic of the image – specifically depth-of-field, motion blur, visual noise (grain) and visual clipping (or, as photographers describe it, “crushed shadows and blown out highlights”). There are infinite variations of the three parameters that will ultimately capture the same amount of light, but each parameter is manipulated individually to minimise noise and clipping, and to create the ‘look’ the photographer intended in terms of depth of field, motion blur, grain, etc.
We can re-purpose the Exposure Triangle to illustrate the interaction between a sound source, the microphone and the preamplifier. Let’s call it the ‘Level Triangle’. There are three parameters involved in getting the desired signal level out of our preamplifier: the SPL of the sound source at the microphone, the Sensitivity of the microphone, and the gain of the preamplifier. The interaction between them is shown below:

Note that Sensitivity gets lower, not higher, as we move upwards. For any given SPL, reaching the desired signal level requires the right combination of microphone Sensitivity and preamplifier Gain, while keeping Noise and Clipping in mind. After changing any one of the three parameters, you will need to change one or both of the other parameters to maintain the same level.
Increasing the SPL of the sound source (playing louder, turning up the volume or moving the microphone closer) requires lower Sensitivity from the microphone and/or lower gain from the preamplifier to maintain the same level, while decreasing the SPL (playing softer, turning down the volume or moving the microphone further away) requires higher Sensitivity from the microphone and/or higher gain from the preamplifier to maintain the same level.
LEVELS NOM NOM
The Level Triangle shown above provides a good way of visualising the relationships between the sound source’s SPL, the microphone’s Sensitivity and the preamplifier’s gain, but if we want to get into specific values we must resort to decibel mathematics. Alternatively, we can let someone else do the maths and use a nomogram, as shown below.
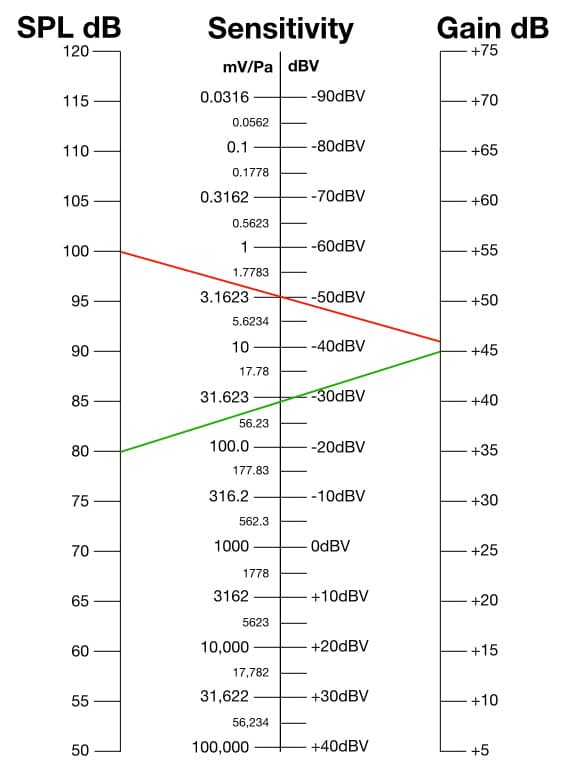
The nomogram above has three vertical axes labelled SPL, Sensitivity and Gain. If we know any two of the three parameters, locating them on their appropriate axes and drawing a line that connects them while also intersecting all three axes will show the third value. Let’s say the sound source’s SPL was 100dB and the microphone’s Sensitivity was -50dBV. Drawing a line (red) that starts at 100dB on the SPL axis, passes through -50dBV on the Sensitivity axis and continues onwards ultimately intersects the Gain axis at about +46dB. This tells us that we need +46dB of gain from the preamplifier to bring the microphone’s output signal up to the industry-standard NOL of +4dBu, assuming the sound source has an SPL of 100dB and the microphone has a Sensitivity of -50dBV.
Similarly, we can use the nomogram to choose the microphone’s Sensitivity. Let’s say we had to capture a sound source with an SPL of 80dB, but didn’t want to use more than +45dB of gain (perhaps because our preamp sounded best at gains of +45dB and lower). A line (green) starting at +45dB on the Gain axis and connecting to 80dB on the SPL axis passes through the Sensitivity axis at about -29dBV, meaning the microphone would need a minimum Sensitivity of about -29dBV. Any microphone with a Sensitivity higher than -29dBV would require less than +45dB of gain and would, therefore, meet our requirements.
The nomogram below shows the gain settings required by five different microphones at 115dB SPL, 94dB SPL and 80dB SPL respectively. The first microphone is Shure’s Beta52A (red), chosen for its very low Sensitivity of -64dBV. The second, third and fourth mics were chosen as industry standards representing a dynamic (Shure’s SM57, blue), a ribbon (Royer’s R121, gold) and a condenser (Neumann’s U87, green). The fifth mic is Audio-Technica’s 5040 (grey), chosen for its very high Sensitivity of -25dBV.
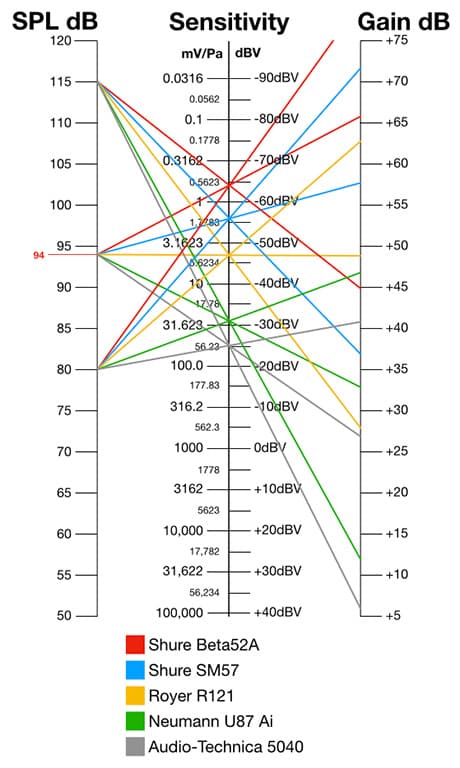
Compare the settings for the Beta52A (-64dBV) against the 5040 (-25dBV). At 80dB SPL the Beta52A requires so much Gain that it goes off the gain scale (+79.8dB) and would need an in-line booster to minimise preamplifier noise, while the 5040 requires a comfortable +41dB of again. At 115dB SPL the 5040 almost drops off the bottom of the gain scale and would require a pad to ensure signal peaks don’t overdrive the preamplifier’s input circuitry or downstream devices and cause clipping, while the Beta52A sits at a comfortable gain of +45dB. Extreme Gain requirements, as demonstrated here, indicate that we’re using the wrong microphone for the job: you wouldn’t use the Beta52A to capture a whisper, and you wouldn’t use the 5040 to capture a kick drum.
(Note that the gain values on the nomograms shown here are based on amplifying the microphone signal up to the industry-standard NOL of +4dBu. If you’re using a ‘closed-box’ system such as an interface or digital mixer that has no obligation to conform to the +4dBu NOL, you’d need to re-calculate the gain values based on that system’s NOL – which is most likely going to be the RMS voltage required out of the internal preamplifier to produce a level of -20dBFS out of the internal AD converter.)
CHOOSING MICROPHONES
If we know the sound source’s SPL at the microphone, and if we know the microphone’s Sensitivity, we can calculate the level of the microphone’s output signal level (as shown in the installment about Sensitivity). As long as that voltage remains between 0.388VRMS and 0.00388VRMS, it will be within the Goldilocks Zone of the preamplifier used for our example.
From there we can calculate how much gain will be required from the preamplifier to bring the microphone signal up to the NOL or Alignment Level, and whether that required gain lands in the chosen preamplifier’s Goldilocks Zone.
We could also consider the microphone’s Maximum SPL and compare it with the preamplifier’s Headroom to assess the risk of clipping. Also, if we know the microphone’s Self Noise (active mics) or its output impedance (passive mics) and have sufficient EIN information from the preamplifier manufacturer we can determine how much noise we’re going to get from the microphone and preamplifier combination. The processes for making these calculations were shown in the previous installments related to Sensitivity, Noise and Maximum SPL, and can be used in conjunction with the level recommendations discussed in the previous installment to work out which microphone in your kit is best suited for the job – at least in terms of how much gain it will require, how much noise you can expect, and/or the risk of clipping.
The illustration below is intentionally not to scale, but provides an overview of how it all fits together. The microphone for this example is Neumann’s U87 Ai in cardioid mode, which has a Sensitivity of 28mV/Pa (0.028VRMS) and a Self Noise of 12dBA. It’s capturing a vocal (blue waveform) that is conveniently producing an SPL of 94dB (aka 1Pa) at the diaphragm, thereby producing an output of 0.028VRMS. That’s equivalent to -28.8dBu, which we’ll round up to -29dBu.
The preamplifier needs to amplify the U87’s output voltage up to the NOL of +4dBu, which is 1.228VRMS. Simple mathematics tells us that the microphone signal requires an amplification of 1.228/0.028 = 43.86, which we’ll round up to 44. Converting an amplification of x44 to decibels shows us that 33dB of gain is required to bring the microphone signal up to the preamplifier’s NOL and therefore to the DAW’s Alignment Level. Here’s the maths:
20 x log(44) = +33dB
This amount of gain will also sit comfortably within the Goldilocks Zone of any preamplifier, contemporary or not, making the U87 a very easy microphone to get along with.
With a signal of 94dB SPL and an Equivalent Noise Level of 12dBA, the U87’s noise will be 82dB below the signal level. Here’s the maths:
94 – 12 = 82
This gives the signal itself a S/N Ratio of 82dB. We could anticipate some noise from the microphone preamplifier but it will be insignificant compared to the noise from the microphone (as explained in the earlier installments about Noise – especially with a relatively low gain of 33dB). As shown in the illustration below, the microphone’s noise is amplified with its signal. If we were using a passive dynamic or passive ribbon microphone, the noise from the microphone itself would be much lower but the signal would require considerably more gain and the preamplifier would become the dominant source of noise.
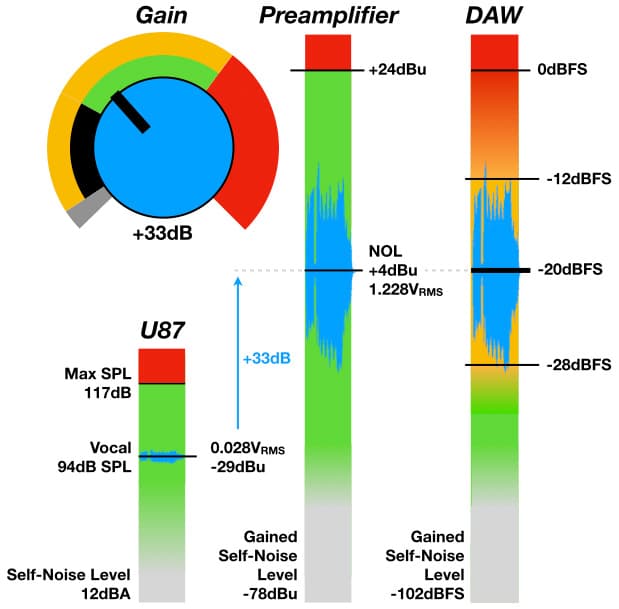
The U87’s Maximum SPL of 117dB gives it 23dB of Headroom above the 94dB SPL signal, as shown here:
117 – 94 = 23
That’s 3dB more Headroom than the preamplifier and DAW in this situation, which means the preamplifier and DAW will go into clipping before the microphone does. When it comes to clipping distortion, the U87 is not going to be the bottle-neck in this application.
Let’s look at something more challenging….
Shure’s SM7B provides a good example. Apart from its musical applications, it’s very popular with podcasters and Youtubers as a dialogue microphone – despite the fact that its low Sensitivity makes it a poor choice for use with the budget preamplifiers that many podcasters and Youtubers use. Let’s take a closer look at this scenario, and assume we have a presenter speaking in a raised voice at a distance between 7.5cm and 3cm from the microphone, creating a convenient average SPL of 94dB. We’ll stick to the preamplifier we’ve been using throughout this series, and aim for a NOL of +4dBu.
At 94dB SPL at the diaphragm, the SM7B’s Sensitivity gives it an output voltage of 1.12mV (0.00112V). Let’s convert that to dBu so it’s easier to work with:
dBu = 20 x log(0.00112/0.775) = -56.8dBu
We’ll round that to -57dBu. To reach the NOL of +4dBu the SM7B requires +61dB of gain (from -57 to +4), which puts it well into the red zone of the simple preamplifier we’ve been using in our examples. Because the SM7B is a passive microphone, and because it has an impedance of 150 ohms, we can use the EIN curve shown earlier (which is based on a microphone with an output impedance of 150 ohms) to determine the noise. At +60dB of gain the EIN is -129dBu, at which point the EIN curve appears to level out and remain at -129dBu for higher gains. Therefore at the required gain of +61dB we can anticipate a total noise of -68dBu (-129 + 61 = -68) at the output of the preamplifier. That’s too much noise – especially in a podcasting situation where the voice is the primary or only sound source and the audience is listening intently, especially if using headphones or earbuds. It also assumes the voice is speaking between 7.5cm and 3cm from the microphone and thereby providing a healthy SPL. That’s feasible in an audio-only podcasting situation, but unlikely in a Youtube situation where the microphone is typically placed 30cm to 40cm from the presenter’s mouth to prevent it from blocking the camera’s view. At those distances we can expect the SPL to drop by up to 20dB, which, in turn, requires up to 20dB more gain and the attendant noise increase that comes with it.
Shure’s SM7B provides a good example.
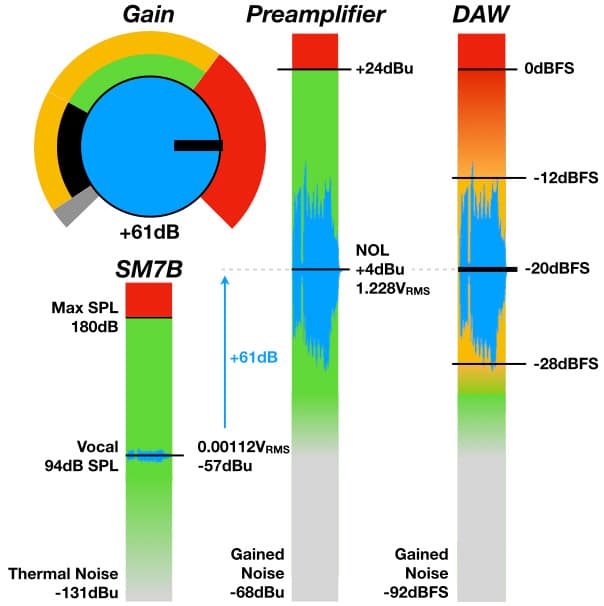
One common solution to the SM7B’s low Sensitivity is to add an in-line booster such as Cloudlifter’s CL1, which provides up to +25dB of gain to the microphone signal before it enters the preamplifier. It won’t be necessary if using a preamplifier with a lot of clean gain, but it can make a significant difference when used with the budget preamplifiers found in affordable interfaces. The Cloudlifter reduces the preamplifier’s gain requirement by 25dB, from +61dB to +36dB, which puts it firmly in the Goldilocks Zone of our chosen preamplifier. We don’t know how much noise will be added by the CL1 because their marketeers have forgotten to put any noise specifications on their website, but it essentially turns the SM7B into an active microphone, in which case the Cloudlifter’s circuit becomes the dominant noise source and the preamplifier noise becomes less significant. If we look at in-line boosters from other manufacturers whose marketeers have better memories, we see Self Noise figures of 11dBA to 15dBA, which are similar to those from small diaphragm condenser microphones. In practice, we can assume the SM7B/CL1 combo will probably be very similar in noise to a condenser microphone with a Sensitivity around 20mV/Pa and a Self Noise between 11dBA and 15dBA.
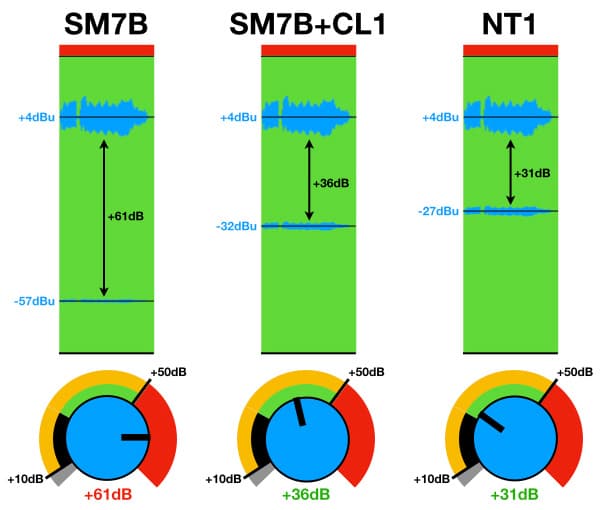
The SM7B/Cloudlifter combo is currently trending with Youtubers and podcasters on a budget, and yet from a noise and gain perspective it is false economy for those applications. In comparison, Røde’s NT1 offers a higher Sensitivity of 35mV/Pa (-27dBu) that requires 5dB less gain from the preamplifier than the SM7B/Cloudlifter combo. Being an active microphone means its Self Noise is the dominant noise source in the captured signal, and with a Self Noise of 4.5dBA the NT1 is practically silent. It costs about half the price of the SM7B/Cloudlifter combo, and promises better noise performance from a budget interface.
[Those interested in the challenges of designing and making an in-line booster are advised to read Jonathan Burnside’s interview with Rick Perotta, talking about the design of Royer’s dBooster, here.]
INTERFACE TANSTAAFL
The example above assumes the preamplifier needs enough gain to bring the microphone’s signal level up to a NOL of +4dBu (equivalent to a 1kHz sine wave with a level of 1.228VRMS), and provides a good argument for not using the SM7B with a budget preamplifier for a podcast or Youtube. However, if we look closer at the podcaster/Youtuber scenario we see that budget USB bus-powered interfaces are the common choice. These interfaces contain the preamplifier and AD converter in the same enclosure, and provide no direct access to the analogue audio signal from the output of the preamplifier itself; therefore they have no obligation to bring that signal up to +4dBu.
If the interface is bus-powered via USB and we assume a power supply voltage of +5V (as available from all USB ports), the maximum possible analogue output signal from the interface’s preamplifier will be 5VPP, or ±2.5VP. If the theoretical maximum signal voltage is 2.5VP and we make that equivalent to 0dBFS in the AD converter it is driving, and then allow 20dB of Headroom, we arrive at a NOL of 0.25VP (0.177VRMS or approx. -13dBu). So in this theoretical example the preamplifier only needs +44dB of gain (x158) to bring the SM7B’s output from -57dBu up to a NOL of -13dBu or -20dBFS, rather than the +61dB required to reach +4dBu. It’s a much easier level for a budget preamplifier to reach, but will still benefit from an in-line booster.
Of course, you might wonder why manufacturers don’t integrate the in-line booster circuitry into the preamplifiers in their budget interfaces. They do, but that increases the cost and then it’s no longer a budget interface. There ain’t no such thing as a free lunch, but in the next installment we’ll see how to get a cheaper one…







RESPONSES