

Home is Where the Studio is: Part 3
In this, the third installment of Andy Stewart’s home studio construction story, we look at some of the do’s and don’ts of practical acoustics and ‘fire up’ the Neve console – it’s all grist for The Mill!
1 April 2008
Tutorial: Andy Stewart
Summer has been and gone… or so I’m told. Did anyone hit the beach or catch a wave? Personally, I don’t remember much about it and today feels like winter has begun in earnest, so I suspect I’ve missed it altogether. I’m not complaining mind you. I had a really nice day back in February, duck-diving waves to wash the plaster out of my hair! Studio construction is a filthy enterprise, make no mistake, and anyone who would tell you otherwise is a politician.
For those who have no idea what I’m talking about, welcome to this, the third installment in a series of articles concerning the construction of my home studio, which I’ve called ‘The Mill’. For those who do know what I’m on about, welcome back and thanks for your patience. As you may have noticed, my articles on the construction have skipped a couple of issues of AT, mainly due to slower than expected progress… One thing you come to appreciate during a project like this is that scale is critically important. A big space just takes more of everything: more time, more money, more patience and more persistence… The Mill must be a very big space!
Over the summer, Cal Orr and myself (and others) have been slogging our guts out building the walls of the studio, lining ceilings, plastering and designing acoustic treatments. We’ve painted, soldered, analysed the empty room with test gear, replaced doors and lighting, hung temporary acoustics, worked on the Neve console, turned it on and even burnt out part of the master section (but more on that in a moment!). It’s been seriously hard, backbreaking work but the results are finally starting to show.
THE MILL-STONE
I was originally intending for this third article to be the final installment in the series; the concluding episode where I wrapped it all up, cut a ribbon with a razor blade amidst cheers and the fluttering of (two-inch) ticker-tape, broke a cheap bottle of champagne over the outboard gear and declared The Mill ‘open’. Now, instead, I’m thinking of just writing an annual report… something more befitting the general pace of the project!
In truth, a hell of a lot has been achieved in the last few months, but the simple reality is that no-one involved in the project can devote all their waking hours to it. Probably the most significant lesson learned so far is that shared enthusiasm for a project like this is a fickle thing that needs to be managed and nurtured, but never relied upon. If you’re embarking on a similar project – especially if it’s a personal space – be aware that, for much of the time, it will be you, and you alone, who does the hard work. There will be fewer occasions than you might think where ‘free’ help will be readily available, and the motivation will always need to come from you.
TAKING SHAPE
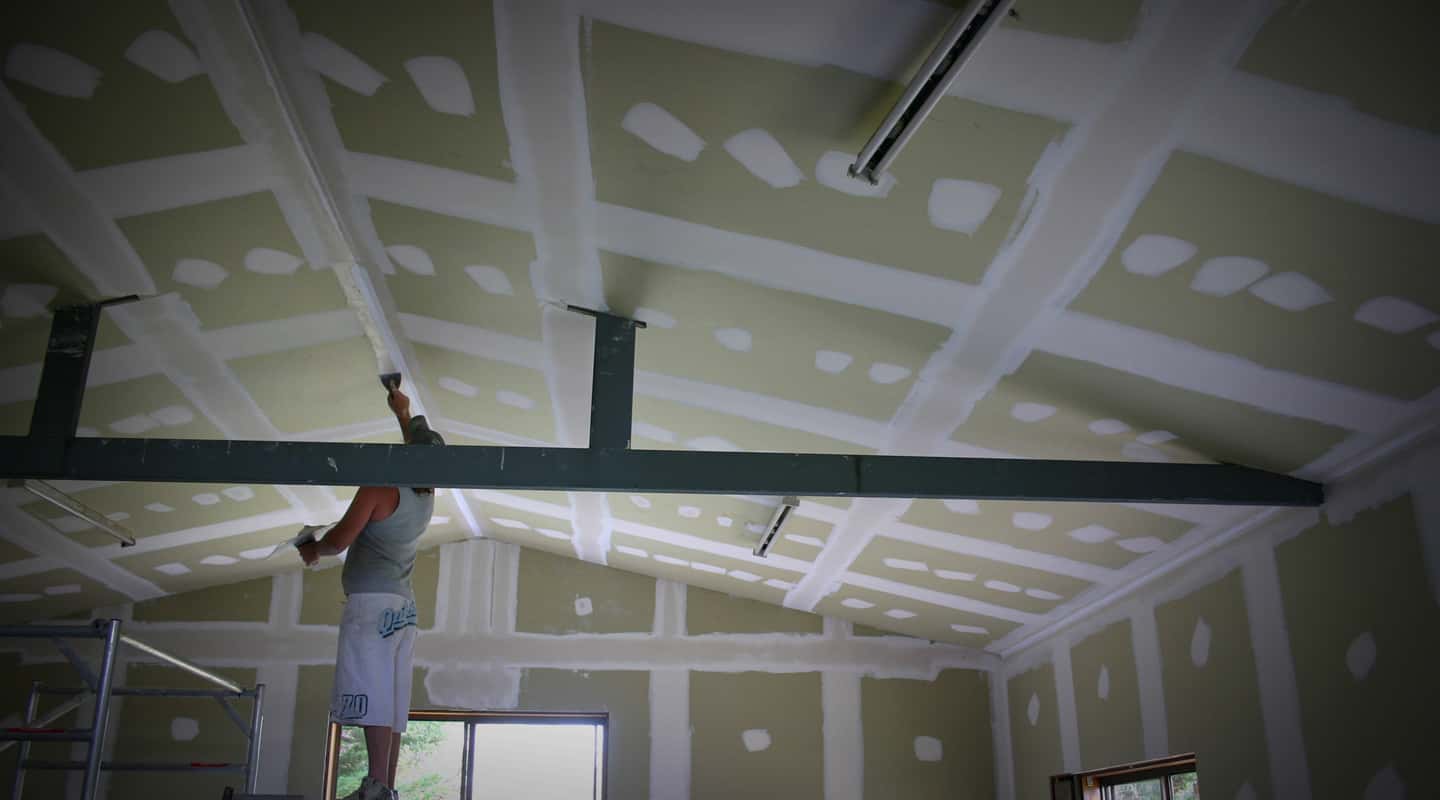
The basic construction of the main space is largely finished at this point, although the straw bales have yet to arrive [more on their role later]. All the walls and ceilings have been lined with Yellow Tongue flooring, the cracks between them sealed and then covered with a second layer of 13mm Gyprock Soundchek.
The ceiling itself, which is around four metres off the deck, has been fixed in place with possibly the stickiest substance on the face of the earth, Green Glue. This has been applied to the Gyprock sheets like a Jackson Pollock painting, the plaster then screwed to the Yellow Tongue as per standard building practise. It’s hoped that the Green Glue – which is designed to absorb resonances and increase the soundproofing capabilities of walls and ceilings etc – will absorb some of these resonances in the roof and reduce the sound of the outside environment. The glue is also in the walls wherever straw bales won’t be pressed up against them. A word of advice for anyone intending to use Green Glue on their construction: don’t get it on your hands or good clothes whatever you do, and don’t try – as someone reportedly did recently – to apply it to the ceiling above you, instead of the plaster sheets themselves! This will surely lead to disaster of globular proportions!


CALLING IN THE PROS
Finishing off the plastering – namely filling and sanding it – wasn’t a job I was looking forward to over the summer, and in January I finally relented and employed professional tradesmen to ‘stop’ (fill, sand and finish) all the cracks between the sheets. I was never particularly confident that I had the skills to do the final ‘stopping’ anyway and I was determined not to let this stage cosmetically undermine all the hard work we’d already done. At the end of the project, it won’t be the heavy walls, multiple layers of materials and fastidious caulking of cracks that will make an impression on others, but rather, the choice of colours and the quality of the ‘finishes’ – the things you can see and touch. To that end, the tradesmen did a fantastic job and were worth every cent. The walls and ceiling have since been painted and the old shed’s dreaded fluorescent lighting replaced with more conventional low-energy globes. It’s now finally starting to feel like a studio.
Applying the plasterboard itself required less skill – once we had a firm grasp of the basics – but the work is arduous and relentless, so be prepared to work hard if you intend to do any of this yourself, and always wear a mask. [See the Getting Plastered box item (right) for more on ‘doing it yourself’.]
SMOKE & MIRRORS
Wiring the studio and developing the acoustic treatments have been the most pressing jobs of late, so this issue I thought I’d embark on a brief discussion relating to these topics. [See Rob Squire’s box item for details on the wiring approach.] Both are actually quite massive subjects in themselves; full of theory and conjecture – as well as facts – so I won’t be attempting an in-depth discourse on either subject here. Instead, I thought I’d talk generally about what we’re trying to achieve and how we’ve gone about it. Hopefully this will clarify a few things for others who might be in the throes of a similar project.
In a space this size, the sonic ‘end-game’ is basically to provide a good ‘Reflection Free Zone’ (RFZ) at the mix position, and reduce the overall decay of the room as evenly as possible, across all frequencies. (For anyone unfamiliar with the phrase ‘reflection free zone’, it’s basically jargon for the minimising of direct early reflections from walls, floors and ceiling at the mix position.) But of primary interest here is probably the phrase ‘across all frequencies’. If one of our primary concerns is to shorten our room’s decay time as evenly as possible across the audio spectrum, we must understand that this typically involves not one, but several, types of room treatment. One treatment alone, particularly if it acts across a narrow frequency range (or is used excessively), will do us no good at all, unless it’s specifically designed to address a diagnosed problem. Room decay, particularly in small rooms, is best treated with broadband absorbers and diffusers, that don’t punch deep and narrow holes in our room tone.

BARN STORMING
Left untreated, The Mill would simply sound like a glorified barn (indeed, that’s all it would be) and mixing with any confidence in the stereo image, tonal balance or depth of field would be impossible. I’d be better off mixing in my bedroom. So all the internal room treatments we’re constructing here are aimed at improving our ability to hear what the speakers themselves have to say, without the room smearing or exaggerating left and right, altering the tonal balance or masking the depth of our reverbs etc.
This will predominantly be achieved by removing energy from the room symmetrically at the boundaries. You can do this with all manner of materials, shapes and acoustic treatments, of course, but it’s right here that disagreements about tone, aesthetics, ‘deadness’ and ‘accuracy’ wade into the debate, confusing many, and scaring others away. Acoustic theory is intimidating stuff, often involving complex and intimidating mathematical formulas that look more like something out of a propulsion laboratory than a home studio. Finding answers embedded here – unless you have a PHD in mathematics – can often lead to greater confusion rather than ‘acoustic enlightenment’. It’s a hellish endeavour in many ways, trying to define what it is you want from a control room, particularly if the room needs to be versatile. Defining that mathematically is even harder – some would say it’s impossible.
The real trick is to treat your room in ways that subjectively improve your experience of what’s emanating from the speakers, and resist comparing your space to photos of Abbey Road or Ocean Way. Room traits like ‘control’ and ‘accuracy’ are probably high on everyone’s list of characteristics, but ‘accuracy’ is more myth than fact and ‘control’ is always a matter of degree. You only have to look at the multiplicity of diverse spaces where good audio is produced to realise that one man’s ‘accurate’ room is another man’s ‘dead’ room; one woman’s ‘balanced-sounding’ room is another’s ‘bright and live’ room. It’s all a matter of taste, just like music itself. One thing’s for sure, you can spend a million dollars building the ‘perfect’ room and still not like the results, and yet, even with 100 bucks, significant improvements can be made.
In my humble opinion, the simplest thing that any control room (‘mixing room’, ‘production room’ – call it what you like) needs to be, above all else, is familiar. If this is true, then it’s perhaps also true that debates about room modes, volumes, Sabines and diffractals are sometimes overemphasised. I’ve mixed in commercial facilities and bedrooms, lofts and headphones; environments that were totally different by almost any scientific measure you’d care to nominate. Yet I’d like to think my mixes have remained fairly consistent despite these differences. The consistent ingredients are always your own skill, an A/B switch and your hearing. That’s not to say discussions about acoustics are bunkum, they just need to be kept in perspective. Fact is, there’s no such thing as the perfect room, so never let scientific ‘proofs’ convince you otherwise.
The trick is to design your space with a good balance of acoustics, aesthetics, ergonomics and practical usage in mind. After that, it’s up to you to become intimately acquainted. Once you’ve done that, the room will become your greatest asset. Remember, not even the ‘million dollar’ rooms can guarantee your mixes will translate into the outside world. There’s no gold pass to perfect mix translation given to any room. That work still needs to come from the operator, regardless of how much money was thrown at the building. Great mix engineers aren’t made great by the ‘perfect’ rooms they inhabit, but by how well they interact with them.
you can spend a million dollars building the ‘perfect’ room and still not like the results, and yet, even with 100 bucks, significant improvements can be made


Getting Plastered: Anyone who knows me will attest that I’ve never been known to get plastered on my own, but the other week I suddenly got a taste for Gyprocking when no-one was around. These pictures tell the story of how successful I was. After manhandling this particular sheet into place on my own with great difficulty – 13mm Soundchek is very heavy – I leant down to pull the power cable through a hole in the plaster and the whole sheet buckled over, snapped, then crashed over my head like a breaking wave. It quickly proved that plastering (particularly for amateurs) is a two-man job. Attempt it on your own, and this might be the result. Although the Gyprock is heavy, it’s actually pretty fragile. Once it gets momentum up, trying to stop it generally causes it to snap.
Green Gloustics: The best way to understand how Green Glue works is to first realise that, when a wall (or ceiling etc) comprised of two plasterboard sheets flexes, the two sheets try to slide over one another. The Green Glue, which cures between them like sticky rubber, is constantly trying to resist this action, pulling them back as the sound waves attempt to induce this wall motion – using up heaps of energy. The sound waves are converted into innocuous heat energy rather than transmitted through the wall or reflected back. To find out more, visit: www.ultrafonic.com.au

MEANWHILE BACK AT THE RANCH
At The Mill, we’ve specifically chosen to line portions of the main control room with straw bales to absorb some of the early ‘specular’ reflections – reflections that bounce off a boundary straight at you like a billiard ball off a cushion. We’re also planning to use the bales across the front corners of the room to act as bass traps. The straw bales are thick, complex structures that absorb sound across a broad array of frequencies, making them well suited to drawing substantial amounts of energy from the room. Anywhere we can see the speakers reflected in a mirror from the mix position will attract this type of treatment to minimise these early reflections [more on this later].
CORRUPTIVE REFLECTIONS
So why must these early reflections be tamed? Well, if reflections in a critical listening room are early enough (roughly inside the Haas zone – see box item on page 66 for more) your brain cannot discern between what’s coming directly from the speaker and what’s bouncing off the nearby walls. It’s a bit like having several sets of extra speakers playing back your mix from different parts of the room. If they’re close enough to the main stereo monitors, you won’t be able to tell them apart and this will result in a big ugly comb-filtered mess of sound arriving at different points in time, all perceived as one! This scenario needs to be well avoided if you’re to stand any chance of hearing the ‘truth’ of what your speakers have to say.
Thankfully, the inner walls of The Mill are relatively distant from our listening position and many of our ‘early reflections’ will be fairly easy to control. Given that they’re more than 3.6m from the mix position, it’s not critical that we treat these reflection points with fully absorptive panels (which convert sound energy into thermal energy), but in smaller critical listening rooms, the need to tame these early reflections is more compelling.
CHEAP & CHEERFUL
Anyone who’s trying to improve their room with the aforementioned 100 bucks would do well to consider these ‘specular’ reflection zones first. You can work out where these are by performing the well-documented and relatively simple ‘mirror’ trick.
Grab a mirror and hand it to a willing helper (this is a two-person job if you don’t want it to take all day). With mirror in hand, get your helper to walk slowly around the internal walls of your space, while you park yourself in the mix position. From there, wherever the mirror reveals the nearest speaker, that’s where you need to place an absorptive panel. Mark these points with an ‘X’. This will be a specular early reflection point and if it’s close enough (within about 3.5m of the mix position) it should be treated with a broadband absorber. (Remember, there are also specular sound reflections off the roof and floor too.)
So where do you get several of these absorbers for 100 bucks? Well, old mattresses are free from any mini-skip, and relatively thick. If you stand some of those in the room you’ll improve your ‘reflection free zone’ out of sight. Frame them with timber to hold them upright if necessary, and if they still look hideous, wrap them in some plain, relatively open-weave fabric. Other cheap alternatives are old wooden pallets stuffed with wool or assorted blankets. Wrap these in some canvas and hang them like a picture wherever you drew an ‘X’.
Basically, anything that’s soft will act as an absorber (furniture, carpet, people, even air) and the deeper the panel, the lower in frequency its influence will be. Moreover, if the panel projects off the boundary by the same distance as its width (meaning that a four-inch thick panel would be four inches from the wall), the absorptive action will be greatly increased and also act on lower frequencies. Remember, however, that this approach, though reasonably effective, can be a little haphazard and potentially damaging to your room’s tone if you put too much absorption in the space. If you don’t intend to have your room analysed, make sure that no more than about 1/3 of its surface area is comprised of these crude absorbers. Otherwise you might be doing your room more harm than good. And remember, at the most basic level, a wide variety of materials works better than whole walls consisting of only one in particular.


DIFFUSE IDEAS
Back at The Mill there won’t be any mattresses on the side walls (we’ve got the straw bales doing that job) but there will be a timber diffuser on the rear wall in the shape of curved convex panel that will scatter the energy evenly back into the room and eliminate specular reflections behind the mix position. We’ve gone around in circles trying to decide the best (and most reasonably priced) solution for rear wall diffusion, and this seems to be the best option… though, even as I type this, my mind is still looking for other solutions. Either side of this will be a giant bookcase stretching across to the side walls, to increase the diffusion in a totally random and chaotic fashion. So if you know anyone getting rid of books, please let me know and we’ll come and pick them up.
A GABLE GAMBLE
The roof at The Mill has been a cause of great consternation over the past few months. Because it’s gabled, with the peak running lengthways down the room, the roof naturally focuses the sound inwards… and that’s bad. The solution has been to use this ‘problem’ to our advantage by hanging a large thick absorber/diffuser underneath the apex.
From the mix position the central gable is now no longer visible, and many specular reflections that bounce off the roof are deflected into the back of the panel, which is soft. Measuring 2.7 x 2.2 metres, the panel is filled with Rockwool and Tontine to a depth of 40cm, making it a significant broadband absorber. [Check out Mick Wordley’s alternative approach on page 66]. The underside is comprised of four hardwood panels, each raked at a different angle. Whether the exposed timbers of these panels will need to be treated further with more absorbent material remains to be seen at this stage. As the acoustic treatments evolve, we’ll know more about its success.
BACK IN THE (RT)60s
When any professional critical listening room (control room) is designed, one of the basic projected aims is a particular RT60 value of the room. An ‘RT60’ value is the standard numerical representation of the time it takes for a sound source to attenuate by 60dB. In an average domestic environment, this reverberation time (RT) is about 0.6 seconds. For the average studio control room, meanwhile, this value is somewhere between 0.4 and 0.5 seconds – very similar looking figures, I know, but sonically, the difference in ‘liveness’ between the two environments is fairly easy to discern. A subjectively ‘live’ room would start at around 0.7 seconds, for instance. It’s worth noting also that a sound wave in the average domestic space only has to travel about 10 feet before it collides with a room boundary, and before the sound wave has lost enough energy to be 60 decibels lower in volume, it will have ricocheted off around 70 surfaces! Just goes to show you… sound waves will find their way around your room faster than you might think, hitting some surfaces many times over.


The RT60 measurement of the ‘raw’ space at The Mill has been calculated using a single Genelec 8040 speaker, associated microphone and calibration software. We placed the speaker in several positions: low and left, like a typical console nearfield; high and left, to lessen the reflections off the Neve, (which was wrapped in a padded blanket, timber, Styrofoam and plastic); and finally, back from the console at the room boundary, again, positioned left. The calibration mic, meanwhile, was stationary throughout, mimicking the position of someone’s ear at the mix position. Thanks to Steve Spurrier.
THE ’RT OF ACOUSTICS
Before we embarked on achieving an acceptable RT60 value at The Mill, we first measured it with the space empty of everything but the console – no room treatments, no miscellaneous piles of wood, insulation or furniture, just a concrete floor and Gyprock walls.
The results were interesting, to say the least. The RT60 value was around 1.05 seconds, not the vastly tighter 0.4 seconds that we’re hoping to finally measure when the acoustic treatments are in place. We also discovered during the analysis that the decay across the frequencies seemed decidedly even… which is good! The important thing to ensure now is that the acoustic treatments pull back the RT60 value without creating unevenness in the tonal decay.
THE GOOD, THE BAD & THE UGLY
There are several commercially produced acoustic treatment options available to us today, and many of them work well. Whether we use any of these at The Mill though, remains to be seen. The downside of these prefab ‘cut foam’ wall treatments is that they’re expensive (depending on the size of your room), and not particularly thrilling to look at either. But certainly, if your listening room at home can’t afford to be turned into a work site for an untold length of time, these types of kits will usually significantly improve your listening experience without creating any downtime, noise, or dust – all potentially compelling reasons for leaning towards this solution.
Apart from these off-the-shelf products, the list of alternatives is enormous and quite beyond the scope of this article. For now, however, let’s consider at least one of the most widely used materials; it’s benefits and pitfalls: carpet.
Yep, probably the most common acoustic treatment ‘commissioned’ by a home studio is second-hand carpet. The ol’ ‘carpet on the walls’ approach is one of the most archaic treatments in the book. Unfortunately, all carpet manages to achieve when it’s stuck to hard surfaces, is reduce the decay time of the high frequencies (depending on the length of the pile). This has the effect of making a room boomy, rather than tight, since the pile only controls the higher frequencies. The lower tones ring on, more exposed now than ever before.
In this circumstance, carpet acts more like a low-pass filter. What we’re ideally looking for, however, is more akin to shortening the decay setting on a reverb unit. We want ‘even’ and ‘tight’, not ‘dark’ and ‘boomy’. This is why our acoustic treatments need to work together to reduce the room’s decay evenly across all frequencies.
Having said that, carpet already covers nearly half the floor area at The Mill, so it’s not something to be totally avoided! I also know of at least one commercial studio where the bulk of the bass trapping consists of rolled up piles of second-hand carpet, all strapped tightly together and covered with a baffle. And the results are very effective.
As mentioned earlier, don’t rely on any one type of surface any more than you’d only ever eat cheeseburgers for dinner. Consider the room treatments a bit like a balanced diet; incorporating different ‘food groups’ into the overall diet is a much healthier approach.


Mick Wordley of Mixmasters Productions in Adelaide has just built himself a new home studio space out of mud bricks, with a boat hanging from the ceiling! Why?
Mick Wordley: We all have ‘needs’… and many of us audio folk need a ‘room’. But it’s usually too small isn’t it… tacked on the back of something, or out to the side…
If that’s true, then where the hell do you put a bass trap? My experience of bass traps is that they generally take up a fair bit of room, and in my new space there really wasn’t anywhere to install one that didn’t take up too much of my already precious floor space. But then I looked up. Suddenly I remembered that a relative of mine had recently offered me an old boat, and being a lover of marine architecture (sort of takes you away without going anywhere), I suddenly put two and two together. What better bass trap is there than a dingy full of ‘special material’ hanging from the ceiling?! Hanging it meant I could still fit the old Neve console and my guitar collection in there as well… along with a couple of people.
MISTAKEN IDENTITY
Mistakes we’ve made at The Mill so far comprise a list almost as long as my arm. Some of these mistakes include: underestimating the time requirements, booking in clients before we were ready, over-confidence that our design would protect us from impact noise on the outside of the building, and finding technical help outside the city.
When I first embarked on this venture I was already wary of underestimating how long the project would take. Yet, even with several other studio construction experiences under my belt, the process has taken far longer than expected. Some of the tasks, which at the beginning of the project seemed incidental – like wiring the studio – have set the deadline back several months.
The tin roof is still pretty noisy when it rains (which admittedly is almost never nowadays), although it’s a lot better than it was. It also creaks when the sun comes out and the tin expands. We could never have expected the roof to be as quiet as a de-coupled secondary ceiling, of course, but somewhere along the line I figured I just might be able to defy the basic laws of physics – I failed! It’s not critical that we have complete isolation from the outside environment, but when things hit the outside of the building (like rain, twigs or the sun’s rays) it’s not as quiet as I’d hoped. I’ll be looking at other ways to silence the tin roof from the outside in the coming months.
I’ve made the classic mistake this year of guesstimating the end of the building phase, and booking in an album mix based on this time frame. This has placed massive amounts of pressure on everyone concerned and forced us to do several things in the wrong order. For instance, the wiring of the Neve console was beautifully restored at a cracking pace by Rob Squire and David Pleic. But then, in our rush to get it all working, we inserted the very last EDAC connector upside-down, burning out one of the stereo mix bus modules. The console fired up, crackled… then smoked! It fired up all right, just not how we’d hoped! To say that the time frame for completing the wiring was ‘unrealistic’ is one hell of an understatement. The time frame simply didn’t allow for anything to go wrong, and something always does, it’s just a fact of life. Delays and mistakes should be factored into every construction deadline (professional builders probably do this already, who knows) and I was courting disaster even attempting it. Bizarrely, my reaction to the incident at the time was overwhelmingly one of relief. A smoking console meant our deadline couldn’t be met… I could finally relax!
I’m kicking myself now because I’ve been preaching all along that this was a private space without commercial imperatives… but of course, when you spend thousands of dollars on a studio, you tend to want to get some of it back, sooner rather than later. Moral of the story: never ever factor the initial income of the studio into any equations about budget. If you think the ‘early sessions’ will be ‘booked at a discount’ to pay for the construction, you’re already behind the 8-ball.
Getting a tech to ‘pop over’ to do some work has also proved difficult, mainly because it’s outside the city limits. But it’s not just proximity to a city that’s the problem. There simply aren’t enough of them around nowadays to service everyone’s studio gear, and all the ones I know are worked into the ground half the time. So be warned, studios aren’t just a pretty picture in a magazine – they have to work! This means they require maintenance and servicing, and that costs money – more money than a new compressor or microphone sometimes! If you’re setting up a studio, increasingly you’re going to need to be able to service, maintain and fault-find your own equipment. If that prospect alarms you, think twice before you buy that next piece of ‘vintage’ equipment. Chances are, it’ll sit on the shelf for 12 months before anyone has time to fix it!
STATE OF PLAY
All in all, The Mill is progressing well… albeit one step at a time, rather than in leaps and bounds. A friend of mine recently suggested that I should look at all the things we’ve already accomplished, rather than what’s left to be done. Perhaps he’s right. Things can only progress as fast as time and money will permit, and these imperatives are like gravity – hard to escape. Suffice it to say, I hadn’t figured this race to be a marathon, but hopefully by the next installment, I’ll be crossing the finish line without the staggers… but I’m not so sure. Good luck with your construction project, wherever you are!
NEXT UP IN PART 4
Constructing a personal audio facility – Part 4. It’s been a long time between drinks but construction at ‘The Mill’ continues in earnest.
PREVIOUSLY IN PART 2
In this second instalment of Andy Stewart’s home studio construction story, we don the earmuffs, safety goggles and a mask, and ‘get stuck into it’. Andy takes a ‘bullet’ for the team while Cal Orr impersonates Wile E Coyote. Somewhere in amongst it all, a studio takes shape.


RESPONSES