

Home is Where the Studio is: Part 2
In this second instalment of Andy Stewart’s home studio construction story, we don the earmuffs, safety goggles and a mask, and ‘get stuck into it’. Andy takes a ‘bullet’ for the team while Cal Orr impersonates Wile E Coyote. Somewhere in amongst it all, a studio takes shape.
21 October 2007
Tutorial: Andy Stewart
I’m not sure exactly how many people are out there building small or large home studios, but based on the response to my last article, it’s clear I’m not alone. People are building studios all over Australia, in basements and bedrooms, garages and sheds, out of everything from Gyprock and straw bales to shipping containers and rammed earth. Things are on the move and home is definitely where the art is.
I’ve had all kinds of reactions to the photos of my shed, everything from ‘wow it’s big’ to ‘that’s not a home studio, that’s a commercial facility!’. Some have said things like; ‘Bloody hell, that must be costing half a million bucks. Where are you getting the money from?’, while others have given me grief for not having a finished plan and a perfect sense of what the end product will be like before I started. It’s nice to know people are reading the mag with such vigour!
What all these responses have made me realise is that there’s a healthy debate out there about the rights and wrongs of ‘doing it yourself’, which is great. What I want to make clear at this juncture is that the design and construction methods I’m adopting for my particular space are based on my own needs, skills and circumstances, and obviously everyone’s requirements and skills are different.
By exposing my process as it occurs, rather than merely showcasing a shiny new studio at the end of proceedings, I’m hoping to illustrate the fundamental point that no studio goes from a sketch diagram to its first session without some sort of drama, hard work, change of heart, reassessment or even crisis, irrespective of whether you’ve spent thousands on acousticians or five bucks on a pad and pencil. And perhaps more significantly, it’s important to remember that nearly every studio in history has been built within the confines (and limitations) of a pre-existing structure, so they’re nearly always compromised in some way. None attain perfect sonic outcomes or perfectly flat frequency responses; frankly, there’s no such thing. Even so-called ‘flat’ commercial mix rooms – like supposedly ‘flat’ microphones – sound different from one another. Room acoustics is a subjective realm and the last thing any home studio owner should feel compelled to do is conform to some mythical non-existent archetype.
LIVING WITH IMPERFECTION
If there was such a thing as perfect acoustic design and the ‘perfect’ control room, they’d all look the same by now, but of course, they don’t. So if you’re embarking on a home studio construction, take comfort in the knowledge that every room is different and that no two acousticians agree on anything! Actually, getting advice from a professional acoustician is usually money very well spent – provided they’re qualified. But even if you do employ a professional to help design your space, don’t lose sight of one simple fact: time is the real beauty and luxury a home studio affords you, not perfect rooms and tonnes of gear. This makes up for all kinds of shortcomings your home studio might have, by reducing (and in some cases eliminating) the pressure of the ticking clock. Once you’re ensconced in your new space, the time spent working in it will be your greatest asset. Knowing your space intimately – how it sounds and how it translates into the outside world – is arguably more powerful than an unfamiliar studio filled with the best gear on the planet.
So don’t beat yourself up for not knowing everything about acoustics – no one does. Learn as much as you can before you embark on your own space, employ an acoustician to help you if you can afford it, clarify your aims, then go for it. That said (and before I talk any more about what I’ve been doing at The Mill since the last issue of AT), I want to tell you about a couple of small incidents that happened here last week that got me thinking.
STUDIO HEALTH & SAFETY
The other day I was grabbing another batch of insulation from our enormous (but ever-dwindling) pile of SoundScreen, when I heard a calamitous crash. I turned around to see my brother in arms, Cal Orr, falling to earth amid timber, ladders and a shower of nails, screws and dust. It was like a re-enactment of a Wile E Coyote mishap but thankfully Cal came out of it unscathed.
“It’s a good thing you’re a surfer,” I joked as I helped him to his feet. “You seemed to ride the fall like a breaking wave. You okay?”
“I’m fine,” said Cal, as he dusted himself down with a wry grin.
Then yesterday I was up the ladder innocuously driving a tech screw into a hardwood beam when the screw flicked off at high speed and hit me in the face just below my left eye. It struck me pointy end on – I can only imagine what would have happened if it had been one centimetre higher. It was a sobering reminder that construction of any kind like this is dangerous, in a ‘lose your eyesight’ kind of way, and no home studio is worth that.
I was furious with myself for being so stupid. Normally I’m the king of protective clothing. I wear gloves and earmuffs, safety glasses and a mask with almost religious dedication, but for some reason on this occasion I was sans glasses but mercifully not sans eyesight as a result.
It reminded me of an incident several years ago where I was holding a piece of timber for a carpenter who was ripping wood lengthways with a circular saw. Out of nowhere, and in the blink of an eye, the blade caught in the ripped groove and the saw kicked back straight over my right thumb. The result was nasty indeed. My thumb was basically cloven in two and needless to say it was rather painful. I was very lucky that things weren’t much worse, and the lesson was duly learnt. Care must always be taken when building anything with power tools, or for that matter, hand tools. I sincerely hope that AudioTechnology readers embarking on any kind of construction, large or small, will heed this warning: if you can’t afford safety gear and possess the intelligence to wear it, you shouldn’t be attempting it. Get someone else who understands safety to do the work for you instead – it’s not worth the risk.

TANGIBLE PROGRESS
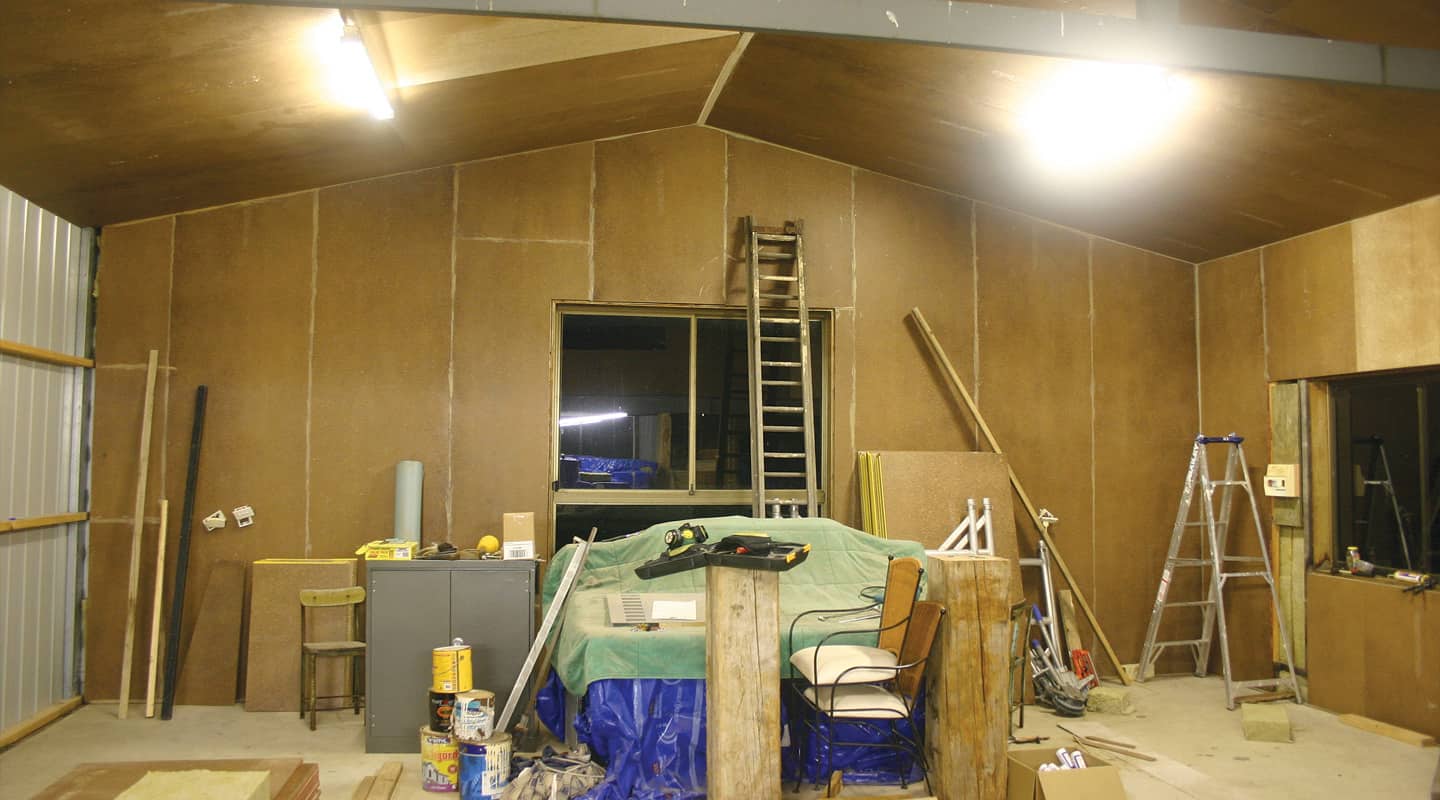
Things have progressed nicely at The Mill in recent weeks. A lot or hard work has been done, more construction methods have been debated ad infinitum, and money has flowed out the door like water down the Amazon. I estimate we’ve already gone through about 100 tubes of Liquid Nails, 100 bags of SoundScreen (R3.5 rated) insulation and about 75 sheets of Yellow Tongue flooring. For every Yellow Tongue sheet we use, we go through approximately 1.25 bags of SoundScreen (the bats measure 430 x 580mm and the Yellow Tongue measures 3600 x 900mm).
At this stage of proceedings we’re still working on the first internal layer, which will cover all the visible surfaces. This will form a SoundScreen/Yellow Tongue shell that will be strong, well insulated and easy to fix acoustic panels to without endlessly searching for studs. A second layer of 13mm Gyprock Soundchek will be applied once the Yellow Tongue layer is complete, and the front wall will then be lined with straw bales. It’s not rocket science at this early stage but there are certainly pitfalls to avoid and working methods to adhere to.
THE FRAMING
As I might have mentioned last issue, the shed’s pre-existing framing timber basically consists of 100-year old, 170mm x 50mm hardwood beams, and the main roof trusses are an all-steel construction. It’s built like a tank (and it resonates like one too), giving us a perfect (but raucous) framework to work within. At 170mm, the framing is abnormally wide – most stud walls are only 90mm deep – so we’ve taken advantage of this and installed R3.5-rated, 120mm thick insulation bats. These are too wide for a conventional 90mm stud wall and you’d be surprised how much they resist being squashed into a space that’s too slender to accommodate them. The SoundScreen bats (which according to their packaging will not rot, burn, deteriorate or go mouldy) provide extra-thick insulation and yet still don’t entirely fill the space inside our 170mm wall cavities. There’s an air gap of around 50mm between the inner and outer walls, which also works to our advantage. The insulation kills off any ringing inside the wall cavity and the bonus 50mm gap provides a small (though not entirely insignificant) extra medium for the sound waves to traverse.
This initial Yellow Tongue layer is being built directly onto the framework, albeit with a few hundred adjustments to make it all fit. The tin shed, as it originally stood, offered essentially no sound isolation whatsoever, so in many respects this first layer is like a ‘base coat’ – to use a painting analogy. Its role will be to provide the building with an airtight outer shell, so great care has been taken to make sure we get this first layer right.
FRAMING ISSUES
What I’ve quickly discovered is that you should never expect the walls of an old shed to be perfectly straight. To that end we’ve had to adjust the framing as we go, making sure things are accurate and square to accommodate the Yellow Tongue. The discipline of making things fit tightly together and ensuring that all cracks are sealed shut is as important to the final outcome as the materials themselves, and I cannot stress this enough – our materials will only be as effective as our construction methods and building skills.
If you leave cracks between walls and ceilings, behind power points or in doorways – regardless of whether you’re building out of timber, plasterboard, stone, straw bales, mud bricks or dried crickets, you might as well forget soundproofing to a great extent. Don’t waste your money on expensive insulation, thick glass, extra layers of Gyprock or special glues and acoustic panels – it will all count for next to nothing if you leave cracks everywhere. (If you don’t believe me, check out the Mind the Gap example on the previous page – it’ll scare your pants off.)
We’ve beefed up The Mill’s existing framing with recycled 4×2 pine (90mm x 45mm), which I got for free from a commercial building site – thanks Brett. This hasn’t been done so much for the sake of structural strength as for sound-proofing and deflection resistance – flex basically. Movement of this kind – otherwise known as wall resonance – is like the movement of a drum; the bigger the surface area the less movement is required to produce an audible corruption back into the room. Resonances in walls are actually complex matters in many respects and often difficult to predict. There are a few methods one can adopt to minimise the affects of these types of ‘invisible’ and insidious movements. Some are costly and require professional tradespeople, others do not – no prizes for guessing which approach we’ve adopted: the cheap, do-it-yourself option.

MASSIVE PASSIVE
One other option of course is the ‘massive wall’ approach: constructing the space out of enormous quantities of concrete and stone. The problem with this approach, however, is that it’s slow, expensive and largely the preserve of the professional tradey, so it’s not a great option for a home studio, especially one that’s on stumps. The other drawback of heavy stone walls is that although they provide substantial mass; can all but eliminate wall resonance; and be great at preventing the transmission of sound between rooms or into the outside world (including bass frequencies); they’re in some respects like knocking in a nail with a sledge hammer. Not only do they typically involve huge amounts of time and money, more importantly, they can often also provide substantially more sound proofing than you may actually require.
Determining realistically how much soundproofing you actually need is the real trick here. There’s no point spending flipping great wodges of cash on ‘soundproof’ walls if your soundproofing requirements are less important than the nature of your room’s acoustics. I know this statement seems to run contrary to everything I’ve said so far, but actually it only reinforces it. And this is why…
SOUND PROOFING VERSUS SOUND QUALITY
There are two fundamentals at work in determining what your walls should be made of. Walls need to be able to both control the sound within your workspace and minimise the sound escaping beyond it. These are two distinct issues that most people perceive as one. Understanding the difference between sound transmission (sound leaking between rooms or escaping into the outside world) and sound reflection (sound bouncing around the room you’re in) is vitally important to knowing what materials to buy for your specific circumstances.
It’s essentially a decision between how much sound transmission you and your neighbours, spouse and children are prepared to tolerate, versus the amount of sound reflecting off your walls, floors and ceilings that you’re prepared to tolerate (or treat acoustically).
THE REAL QUESTION
Like me, you might have chosen to upgrade your home studio because the control room sounds terrible and has more flutter than Melbourne Zoo’s butterfly enclosure. Or it may be that the neighbours are threatening to commit grievous bodily harm ‘on yo ass’ the moment the clock strikes 10pm. It might be a bit of both, of course – it usually is. Either way, it’s best to try and think of these two issues as two distinct problems (acoustically speaking), requiring different solutions. Assuming it’s not just vanity that’s driving you to improve your space, you need to determine (almost in percentage terms) how much your proposed changes are designed to, a) improve your working environment – stereo imaging, mix translation, tonal balance etc – and b) isolate you from the ‘outside world’ – sleeping siblings, irate neighbours, traffic etc.
If you leave cracks between walls and ceilings, behind power points or in doorways – regardless of whether you’re building out of timber, plasterboard, stone, straw bales, mud bricks or dried crickets, you might as well forget soundproofing to a great extent.


If I Knew You Were Coming: The place is in a bit of a mess at the moment but as more and more materials get used up, at least we’ve got somewhere to put the scaffold! In the picture above, Cal Orr seals a few cracks while Pete Baird looks on.
PLAYING THE PERCENTAGES
Where I live – as I discussed last issue – the neighbours aren’t all that close, but the benefit of this physical distance between us is effectively cancelled out by the unusually low outside ambient noise levels, particularly at night. But as I also previously mentioned, the sound escaping from the shed into my house will probably annoy me more than anyone else, since I won’t always be the person working in the studio. I’ve therefore made the decision that sound escaping through the walls is definitely something this construction is trying to minimise. But – and this is an important ‘but’ – there’s no need for me to soundproof the walls to a massive degree (I’m aiming for an overall reduction of around 50dB, or thereabouts – roughly A-weighted).
On that basis, I’d say the wall construction at The Mill is about 60% to do with internal acoustics and 40% with soundproofing. Of course, the shed originally sounded diabolical, with the tin walls and roof scarcely separating ‘inside’ from ‘outside’ at all, sonically speaking. It offered about as much soundproofing as a fish net and when it rained heavily the level of white noise inside the shed was up around 85dB. So my first problem was simply silencing these walls.
Building The Mill’s walls out of stone was largely out of the question because, a) I don’t know the first thing about building stone walls, b) there’s an enormous amount of time and effort involved in their construction (I presume), and c) it would be overkill to build massive stone walls when my ‘soundproofing priority quotient’ (or SPQ) is only 40%. If it had been at 80% maybe I’d have considered it, but even then, probably not. More importantly, I already had walls, albeit sonically inept ones. They might have sounded a bit ‘tinny’ but they were there, and holding up the roof! The obvious choice to me was timber because a) it’s relatively cheap (and in some cases free), b) I have skills and experience working with it, and c) I didn’t want to spend the term of my natural life constructing the place.
What’s more, massive stone walls can often generate as many acoustic issues as they resolve. The fact is, the more you trap sound within a room, the more difficult bass management becomes. In simple terms this is perhaps best illustrated by the analogy of firing a bullet inside a metal chamber (think Han Solo firing off a round inside the Death Star’s trash compactor). The bullet (our sound wave) bounces around inside the space, trapped by the impenetrably hard walls, increasing the risk of you eventually getting struck by it. In any decent listening environment this risk needs to be minimised (or at least delayed) either by letting the bullet pass straight through the walls (possibly injuring your neighbours!) or by providing lots of areas where the bullet can be trapped safely or diffused of its velocity before it hits you. Consequently, in a room with heavy stone walls there needs to be lots of these ‘traps’, which increases the cost of the construction even further.
The trick is to determine (preferably at the start of your project) how much soundproofing your walls need to provide and understand that, in general terms, the more you soundproof, the vastly more expensive things become. The bottom line is this: if you don’t have to soundproof the space, don’t… and if you do, ask yourself this simple question, ‘how much soundproofing do I realistically need?’.
At The Mill I’m not building a tracking facility. I’m not trying to stop the sound of drums relentlessly pounding away on a daily basis or AC30s turned up to 11 – although there will be odd occasions when this is inevitable. What the outer walls of the shed will essentially be required to do – day in and day out – is contain the sound of freestanding nearfield monitors turned up to moderate levels. There are no jets flying overhead, or trains rattling past, and any sounds that do exist around me are irregular and non-critical. I won’t be recording all the time so it’s not vital that I keep these sounds out at all costs. What I do want to do, however, is substantially minimise them.


THE THIRD ELEMENT
So how do we do that? Well, first and foremost we need to cut through what is – to nearly all of us – a baffling maze of conflicting acoustic information, inappropriate (and sometimes inexplicable) mathematics, smoke and mirrors, and understand a very simple concept.
Sound waves are energy and each individual wave is endowed with a finite amount of it – a simple enough concept. Where things get vastly more complicated, however, is in understanding a sound wave’s behaviour when it strikes a surface; a complexity that then compounds exponentially when we consider the sound trapped within a three dimensional space. If you could see sound waves bouncing around in your room it would all seem mind-bogglingly complicated, chaotic even. Angles, materials, volumes and durations all play a part but for now let’s keep it very, very simple.
If you look at Figure 1 you can see a graphic illustration of one such wave represented by an arrow 10 centimetres long (this is an arbitrary measurement). When the arrow strikes a wall (again, somewhat arbitrarily) it is transformed into three new arrows of lesser value. These three arrows share the value of the original unequally between them as they travel off in different directions. The first of these arrows bounces back into the room like light off a mirror, the second penetrates through the wall and our third and final arrow is trapped in the wall itself, never to be seen again. Of course, this very simplistic model isn’t supposed to represent a comprehensive scientific explanation of all the subtle effects occurring in the physical world, but simply to help clarify the basic concepts.
Using this model, very hard and heavy walls – like bluestone or concrete blocks, for example – will tend to produce an arrow back into the room of say 8.5cm, an arrow through the wall of 1cm and a trapped arrow (which actually represents the transfer of sound energy into heat) of 0.5cm – all then adding back up to 10, as our friendly First Law of Thermodynamics demands. (The total sound energy must be accounted for somewhere, since energy can neither be created nor destroyed, only converted from one form to another.) Conversely, lightweight timber and cement sheet walls might produce an arrow back into the room of 3cm, an arrow through the wall of 6.5cm and a trapped arrow of 0.5cm.
From this it’s obvious that big heavy walls are good at soundproofing but not great shakes at minimising reflection into the room, meanwhile conventional walls in your average timber home are often poor at protecting your neighbours from late night recording and mixing sessions, but better than stone at minimising strong reflections and bass build-up.
Where these two diametrically opposed construction methods (which also sound vastly different) come together, however, is in their common inability to absorb sound; i.e., turn some of the energy from the speakers and/or instruments into (inaudible) heat energy – entropy.
In both these examples, the ability of the walls to absorb sound is minimal. The hard walls bounce the sound back into the room like a rubber ball, and the ‘standard’ stud walls let everything escape like Stalag 13. What I’m hoping to achieve at my place is the improvement in the value of this ‘third arrow’ (in red) – increasing the capacity of the walls to absorb sound and convert it into (admittedly infinitesimal amounts of) heat. The best way to achieve this will probably be debated for the next 50 years, but for now The Mill will be employing two structural methods (disregarding for now the room treatments we will employ later on that will increase this ‘absorption’ capacity further).
STRUCTURAL ABSORPTION
The ‘front wall’ is actually going to be made of several angled straw bale surfaces that will, I’m hoping, serve to absorb some of this energy without creating an entirely ‘dead’ front end. Since the speakers will neither be soffited nor right up against the front wall, I don’t want sound splashing around behind the speakers too much, mangling the stereo image. To that end, rendered straw offers a nice mixture of absorption and reflection for relatively little cost, while increasing the value of this ‘third arrow’ substantially. It also has the added benefits of being environmentally friendly and a fantastic thermal insulator.
Behind the mix position and throughout the roof we will also be smearing Green Glue between the layers of Yellow Tongue and Gyprock. Green Glue is reportedly great at increasing the value of this third arrow, acting as a giant shock absorber for the walls, thus reducing the wall resonances. The beauty of this product is that it requires basically no skills to apply and no advanced building techniques whatsoever. If you can squeeze a caulking gun, you can use it!
SALLY FORTH
Hopefully by next issue the walls will be up and we’ll be onto other issues like floating the floor, wiring the studio and treating the room acoustically inside the space. Good luck with your own projects by the way, work safe and if you feel like your own approach might be of interest to readers, drop me a line and we’ll look to incorporate your setup into the next instalment of Home Is Where The Studio Is. Good Luck.
Email your letters and studio construction techniques to: [email protected]
NEXT UP IN PART 3
In this, the third installment of Andy Stewart’s home studio construction story, we look at some of the do’s and don’ts of practical acoustics and ‘fire up’ the Neve console – it’s all grist for The Mill!
PREVIOUSLY IN PART 1
AT’s Editor, Andy Stewart, kicks off a series of articles following the construction of his own studio – warts and all. This issue he asks the crucial question: ‘what’s my motivation here?’


RESPONSES