

Thinking In & Out of The Box, Part 1
With the prevalence of mixing in the box, the temptation is to discount the importance of tracking in a great-sounding space, with great-sounding gear. Jonathan Burnside describes best practice for a hybrid professional-studio-tracking/home-DAW-mixing approach in this two-part series. First up — squeezing every bit of juice out of the studio.
19 February 2012
Tutorial: Jonathan Burnside
B&W Photos: Alistair Hotham
Colour Photos: Adam Gresty
Recently I met up with Melbourne-based band Slow Chase in Adelaide to track three songs. Because we live 12,548 kilometres apart, I needed to be certain I got everything from the recordings I’d want for mixing back in California. Preparing for the sessions, I realised I was approaching them differently than if we had booked out a studio and hunkered down together for the entirety of the project. Instead, it would finish with me swilling lonely cups of coffee in my home mix room, then uploading the files to my cloud account for the band’s approval. This is a new way of working for me. I’ve owned three full-blown recording studios over the years and I’ve spent more time in big analogue rooms than I care to think about. It got me thinking about how many projects are now started in larger recording studios and finished in smaller home studios. Done properly, there is no reason why audio quality has to be a victim of this downsizing, which has killed off some of the world’s larger recording studios. In this article, we’ll take a look at how to get what you need out of tracking in a studio facility so you can finish in a home studio and still create great sounding mixes. Next issue, we’ll look at some techniques for mixing these well-recorded studio tracks at home.
TAMING THE SPACE HOGS
The most important ingredient for a good final mix is not a vintage mixing desk, analogue compressor or the latest plug-in bundle. It’s a well-performed tight arrangement of the song. Arrangement in this sense means frequency placement as well as the running order of verses, choruses and solos. A good sonic arrangement results from listening carefully to how each instrumental and vocal part interacts frequency-wise as well as harmonically and rhythmically. The most obvious place to start is the rhythm section. Are the kick drum and bass guitar patterns tightly locked? Are they providing courage and support for the rest of the instrumentation at all times or just playing with themselves in a masturbatory manner? The rhythm section is the foundation of a successful mix. If there are clashing parts, extraneous notes or weedy tones, building a solid mix will be difficult. Minimize cymbals, especially if the drummer is a basher. Half-opened high hats may drive the band at a show but in a recording they are Space Hogs. Drum fills should usher in the next section solidly and not cause tempo wobble, which can cost the song its solidity and conviction? Nailing arrangements down before going into the studio is critical. While you may have unlimited time to edit the tracks in your home studio, creating the right ‘feel’ after the recording is difficult. Get it right the first time.


THE FINAL FRONTIER
There is only so much space available in a mix for each frequency and overcrowded mixes sound small and claustrophobic, not huge and expansive. Softly tinkling wind chimes over a huge sub bass are easy to hear because they are in different frequency ranges. Add in a distorted Stratocaster and a ride cymbal and the chimes will be reduced to extraneous noise. The arrangement of instrumentation should take into account what frequency bandwidths are prominent in each element you will be tracking. Get band members to understand that what they are playing is not ‘their part’ and ‘their sound’ but rather one of many competing elements in a mix. If they are willing to ‘kill their darlings’, you’ll have a much better chance of moulding the performances into a cohesive mix. Hold every part, each amp setting and the musicians’ performances up to the light before entering the studio. Listening critically in this manner almost always results in the simplification of some parts. Recording the songs in a home studio or a practice room before going into the tracking studio helps immensely. Write notes on these preliminary recordings and come to agreement with the band members about exactly what they will be playing and what their sounds will be.
SPACE INVADERS
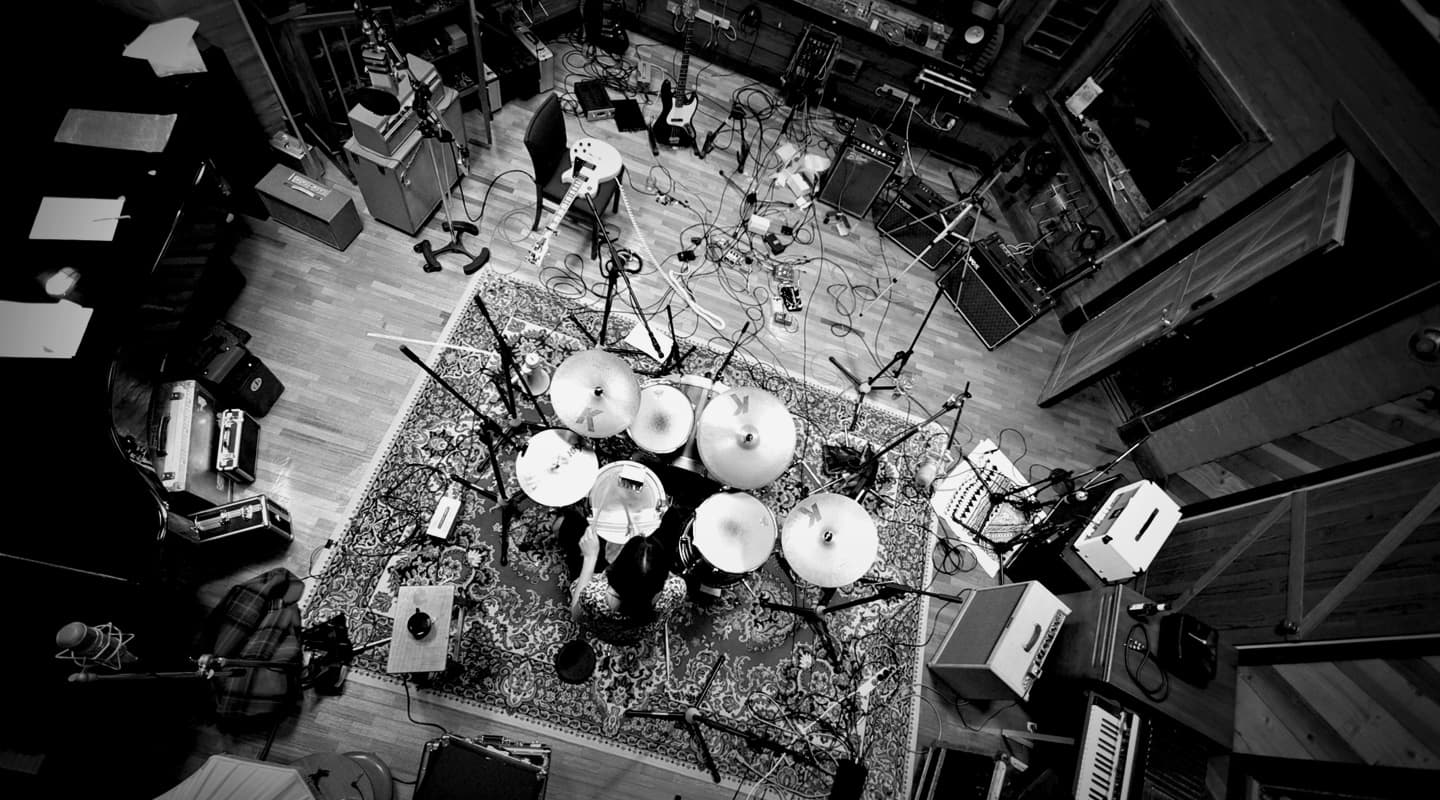
Now that you’ve tuned up arrangements and have the band firing on all cylinders, the next step is to find the right recording space for the project. You and the band should have a firm idea of how you want the mixes to sound. For slow chase, we wanted big, open drum sounds with natural and mangled room ambiences. this meant finding a fairly large drum room with nice sounding decay, uncluttered by flutter echoes and standing waves. We planned on using little or no digital reverb in the mixes so the sound of the room needed to match what we envisioned the mix ambiences to be. Some projects have completely different requirements. If the band is playing up-tempo punk or metal, too much recorded ambience can wash out the drums’ ability to cut through in the mix. Recording them drier and adding digital reverb in the mix can be a better approach.
If there is little or no bleed from the other instruments onto the drum mics, the drum performances can be kept, even if the other instruments need further work. Room mics that have only drums and no instrumental spill can be cranked up in the mix without washing out the other instruments, so isolation is important for mixes with lots of natural drum ambience. Work out what should be recorded in isolation as you decide what will be tracked live with the drums. Work out what sightlines are available from each isolation area. Seeing each other can be important, especially for drummers and bass players who are used to working with visual cues. Getting the band loaded in and headphone mixes up can take time but preparation can minimise this.
Done properly, there is no reason why audio quality has to be a victim of this downsizing, which has killed off some of the world’s larger recording studios
AVOIDING FAULTY O-RINGS
When perusing gear lists while shopping for a tracking studio, know what you need for your session. Check the mic list to make sure you are covered. A physical inspection of the mics beforehand is a good idea. Be wary if many of the mics have dents from drumsticks or being dropped. This can indicate a lack of maintenance or poor treatment of gear. Racks full of vintage outboard look great but what is the working condition of each piece? Having to continually re-patch because of faulty knobs, switches and wiring can waste time and kill the flow of the session (and create the temptation to kill the studio owner). A simple rack of reliable preamps is more useful than a control room full of esoteric gear that works intermittently. Ask around for other engineers’ and musicians’ experiences with the studio’s equipment maintenance before deciding to record there. The need for reliable equipment extends to the band’s gear as well. Drum heads, guitar strings and batteries should all be replaced before the day of tracking. If the drum set is mediocre, rattles or is not well-suited to the songs, it would be worth borrowing or renting a different one. As the old saying goes, ‘crap in, crap out’.
When deciding on whether or not to use analogue tape, the studio’s level of maintenance should be considered. Analogue tape provides a lovely glue and smoothing of high-frequency content such as cymbals and the buzzy top end of distorted guitars. But is the machine well-maintained and properly aligned? MRL alignment tapes are becoming a bit of a rarity in many newer studios that have jumped on the analogue bandwagon by buying an archaic two-inch machine. I’ve asked studio owners about alignment and have been told, ‘we had a tech take care of all that when he installed the machine’. Not good enough. Proper alignment and biasing of a tape machine for each type of tape and recording level used is imperative for getting out of the machine what you put into it, frequency-wise. The alignment of a tape machine drifts over time so if this is not checked before your session, realise that you’ve entered a crapshoot, crap being the operative word. Another consideration is how much editing or programming will be done to a bar and beat grid later. The exact speed of a tape machine motor drifts slightly throughout a song. If you record onto tape and dump it into your daw without a proper lockup system, you can forget about any accuracy in your editing grid. I love recording on tape but I make sure it adds more to the session than it limits. For the Slow Chase sessions, I opted not to use analogue tape because the studio had Nyquest converters for the front end of their ProTools system. These converters sound great and it was a big timesaver not to have to go through the tape machine alignment, lockup and transfer processes. When deciding on your medium for recording, look carefully at the analogue-to-digital converters in the studio. These are the gateway and quality controllers for the audio files you’ll come out with. I record 24-bit, at 88.2k or 96k through good converters because I want the highest resolution possible. Keep in mind that mixing with higher sample rates requires more DSP for each plug-in, so record at a resolution that won’t severely limit your available mixing power.
SPACE TRACKING
Now that you’ve decided on your recording medium and chosen a studio, it’s time for the all-important tracking session. The gear, sparkling from spit and polish, is all loaded into the studio and you are on to your second cup of coffee. (The studio gear that provides the most rewarding results is an espresso machine and a pile of good beans.) Looking at the racks of vintage compressors and boutique preamps in the control room, you say to yourself, “I’ve only read about some of the stuff, but I want to use it all! Where do I even begin?” It’s easy to be overwhelmed by the possibilities and it’s tempting to try to play with all the new toys. But make your setup list direct and simple. Visit the studio beforehand and snap some shots of the equipment racks and the patchbays on your camera or phone if you’re a visual person.
Cross-referencing the studio microphone and gear lists, make an input chart for each track you’ll record:
It could look like this:

You’ll be able to show up and calmly hand your input chart to the second engineer instead of wasting time befuddled by racks of gear and closets full of mics.


MULTITASKING IN SPACE
When planning setup, see if there are enough good preamps, compressors and microphones to allow for overdubs to be set up along with the drum kit and other basic instruments. It’s not always best to work on drums and instrumental tracks for hours or days, leaving the vocals until last. Maybe a stellar vocal recording chain in a good sounding area of the studio can be patched in at the same time basic tracking is up. this vocal chain could double as a drum room mic. Write down settings for the preamp, compressor and EQ for each task and switch between the two. This will give the vocalist more time to really get the vocals right instead of having to stand and deliver multiple songs back-to-back. Overdubs also help prevent drummer fatigue and gives a break from the bashing when needed. (Remember to loosen the snare strainer before overdubbing in the room with the drums. It might sound like there’s a rattlesnake in the corner otherwise.)
Your input list should consist of a mic setup that can record everything you need for each song without having to continually change things during tracking. Close mic the drums and instruments, add a variety of room mics and record them all for every song. A drum mix for some songs may consist only of an over-compressed room mic and a bit of the front of kick mic. Other songs may not use much room sound and rely on close mic-ing instead and some may be a combination of the two. Create completely different sounding drum ‘setups’ in the mix simply by muting and unmuting tracks and adjusting levels. Think through all the songs’ drum sounds and consider the equipment lists and the rooms. Then plan a mic and outboard setup that will track what’s needed for each of the songs while giving extra possibilities to all of them at mix time.
WILD AT HEART
Tracking in good sounding rooms provides an opportunity to capture signature sounds with a vitality that is hard to create with plug-ins. Put up a blumlein, ORTF or ms stereo pair or two and a few mono mics mangled by compression to some degree. capture ‘realness’ with the stereo pairs and manipulate the environment with the over-compressed mono ‘wildcard’ mics. Use your ears and experiment by moving the room mics around. Get weird. Place a ribbon mic, shin-high behind the drummer pointed at the kick and smash it through an 1176 with all the buttons in, phase reversed. Adding tracks like this will make a drum mix stand up and howl. The spontaneity of an oddly placed, heavily compressed room mic pushed up in the headphone mix can inspire musicians. Try creating a vibe this way that points in an attitudinal direction.
Over-compression on room mics brings up cymbal volume and sustain to the point where it can overwhelm the other drums. Moving compressed room mics low to the floor can help minimise this. If the songs were to be mixed in an analogue studio, I might wait to compress these tracks so I could tweak the release and attack of the compressors in the mix to fit the tempo of each song. If the mixing is to be mainly in the digital domain, I print room mics with over-compression. I find analogue compression superior to digital compression for this application. To dial in the attack and release times for each song while tracking, I have the drummer play a few bars at tempo before rolling. Timing the pumping of the compression to the song’s rhythm propels the track. Timed poorly, the compressor squishes the drums when they should be breathing, stomps transients and dulls the track.
Tracking in good sounding rooms provides an opportunity to capture signature sounds with a vitality that is hard to create with plug-ins
A CYMBALIC GESTURE
While drum samples can be mixed in easily to replace or augment the recorded tracks, this isn’t the case with cymbals. The sound of the overhead mics is crucial. Too much ambience on the overheads is an extremely difficult thing to correct while mixing, so don’t forget about those tighter, faster songs when deciding on mic patterns for the overheads. In a big live room, figure-of-eight and omni patterns will add a lot more ambience. When setup, put the monitor mix in mono and listen to the different combinations of mics you may be using in the mix. Make sure the drums and cymbals sound natural and in phase with each other and hollowness doesn’t start occurring when you push up room mics with the close mics.
I always record single drum and cymbal hits with all of the drum and ambient mics before the drum kit is packed away at the session finish. These can be used to replace any drum problems found during the mix. By creating a custom stereo sample of the drum or cymbal with matching ambient mic levels to those of the song being mixed, missing drum or cymbal hits can be replaced without sounding mismatched. It’s also a convenient way to build your own sample library.
Next issue, we’ll look at EQ decisions and some techniques for mixing the tracks in a smaller DAW studio.


RESPONSES