


Tape Flanging in the New World
If you think your old tape machine is good for nothing these days, think again.
14 April 2014
Tutorial: Paul McKercher
It’s like you’re lying face to the heavens on the still warm flat hood of a prize ’70s muscle car as the underbelly of a gleaming jet plane fills your view. Passing closely over you the sound climbs, builds and crescendos, piling on top of itself, then reaching a climax as it collapses in a screaming cascade of comb filters, phasing and Doppler effect.
In an attempt to simulate such an awesome effect, flanging by way of tape manipulation first appears on record – by some accounts at least – in 1959, then features as a popular psychedelic motif in the acid rock of the late ’60s. In those pioneering days creating such an effect involved the many moving parts and graceful mechanics of multiple tape machines but also, crucially, a hands-on live flanging performance by the operator.
Here’s how it was done:
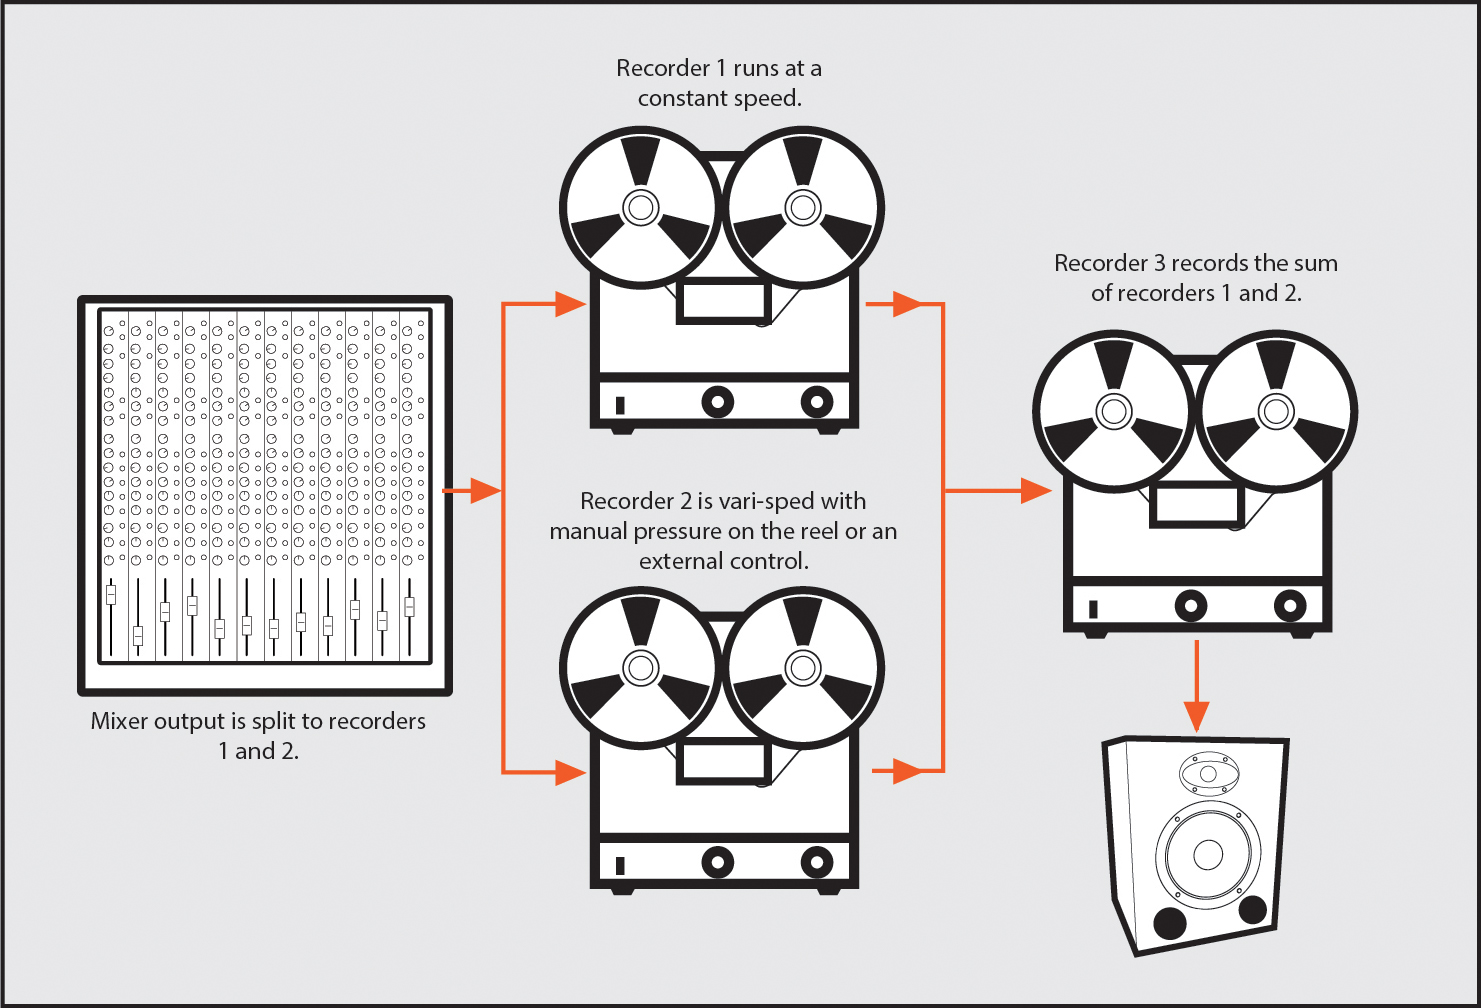
DIAGRAM A – THE SETUP
Note, in the diagram above, that the classic tape-flanging effect is created by feeding two identical audio signals to two tape recorders, mixing the outputs of those machines back together and recording their interaction onto a third master recorder. The difference in the arrival times of the audio signal at the repro heads of the two machines is what creates the flanging effect when both machines are monitored simultaneously or recorded on a third machine. There are two basic ways of causing this time mismatch to occur: ‘hands-on’ or via a vari-speed control device. And just to clarify before we dive in: flanging is not merely an ‘off-tape’ delay technique, it’s a different effect altogether.
A finger pressed lightly against the flange of Recorder 2’s supply reel (see Diagram A) causes the tape on that machine to slow down with a subsequent delay in the arrival time of the audio signal at the repro head (given that the tape is now taking longer to travel the distance between the record and repro heads) when compared to Recorder 1, which is running at a constant speed. When the finger is released, the machine speeds up and the two machines align once more. This is the essence of tape flanging. A better option to the ol’ ‘finger-on-the-spool’ approach, however, is to use a tape machine with a vari-speed control, which is not only capable of replicating the proverbial hands-on approach, it’s by far the more controllable method.
TWO-CAR COLLISION
By way of analogy, picture if you will two cars travelling side by side along a two-lane highway (Diagram B): one car travels at a constant speed while the other slows down, then speeds up, falling behind, catching up, then moving ahead of the car travelling at the fixed speed beside it. Imagine these two vehicles represent the signals coming off the repro heads of the two recorders – the respective positions of the cars on the highway are the audio signals’ positions in time.
As the manually braked (or vari-sped) recorder decelerates, the comb filtering generated between them falls in pitch as the delay time between the two repro signals increases. Conversely, when the finger is lifted free, the machine accelerates and the comb filtering rises once more as the delay between the two signals returns to nil. If a vari-speed control device is used the variable-speed recorder can continue to accelerate until it’s actually moving faster than the constant machine, whereupon – to use the car analogy once again – it actually overtakes and gets ahead of the car travelling in ‘cruise control’, passing through the ‘zero point’ (where the cars are exactly side by side), where all combing, in theory, disappears completely. Unlike the predictable rise and fall of an oscillator in a modern digital flanger, the operator’s manipulations can control the pitch and sweep of the flanging effect by adjusting the relative positions of these two cars, creating an original performance to match the pitch and intensity of the music.
The resultant recording on the third tape machine could then be physically cut into a master tape as a ‘flanged section’ or perhaps, in a rather hit-and-miss process involving tape markers and precise timing, flown back onto the multitrack to become part of the mix.
These days DSP or digital delay takes the place of the slower tape machine by providing the necessary delay but – and this is the trick – there are two things an analogue tape flanger can do that make it unique and worth pursuing as a viable performance tool. The first I’ve already hinted at: no two tape flange performances can ever be the same. Being infinitely more random than the up/down sine-wave oscillations of an LFO, the hands of a human operator will always come up with something original, unique and unrepeatable.
Seemingly quaint and old fashioned in an environment where copy/pasting and effects automation is so much a part of our daily workflow, I hereby guarantee that no mouse movement or keystroke will ever give you the tactile or sonic satisfaction of a perfectly performed analogue tape flange.
Secondly, and more impressively, tape flanging can achieve so-called ‘zero point’ flanging. This refers to the point at which the slower vari-sped tape machine, having had the brakes released and accelerating, overtakes and gets ahead of its partner, passing ever so fleetingly through the ‘zero’ point – a point of phase and wave alignment where the two machines are in perfect sync.
At this point in time, the practical differences in manufacture, alignment, and sound of the two recorders ensure that there is, in fact, no actual perfect zero point. Nevertheless, the mathematics of ‘infinity to zero and back’ can only begin to hint at the depth and complexity of sound produced by analogue comb filters that scream up a ramp towards infinity, pass through ‘zero’, then seemingly fall from the sky back to earth. Unlike digital or DSP-based flangers, only tape flanging can achieve this, though I’m happy to be contradicted by a digital enthusiast who can figure out how to do it.
The delay of a digital flanger cannot, of course, slow down, speed back up, reduce to zero and then move into the ‘future’, ahead of the signal coming off the DAW… so how is it possible that an analogue tape flanger can pull off such a trick?
Herein lies the genius of this system – the output of each recorder is not in the ‘present’ in the way that the unaffected dry signal of a digital flanger is in the ‘present’. Because both analogue tape signals are coming off the repro head of the tape machine, they’re both in the ‘past’, as it were, by the amount of time it takes the tape to travel from the record head across to the repro head.
When the vari-sped recorder is made to run slightly faster than its constant-speed counterpart, its off-tape signal isn’t in the ‘future’ at all – just not as far in the ‘past’ as its slower partner. Geddit? [See Diagram B: ‘Two Cars Travelling On a Road’ for a visual illustration of the concept.]

TWO HEADS BETTER THAN ONE
Back to the future – using a DAW and one varispeed-equipped tape machine, we can still recreate this stunning effect.
With only these two tools at our disposal, the DAW takes the place of the third master recorder. By recording two ‘off-tape’ passes back into our DAW – one with vari-speed, one without – we can simulate having the two recorders of our first setup. All we need to do then is measure the ‘off-tape’ delay and place the ‘flanged’ tape pass back into ‘real-time’ (by removing the record-head/repro-head time discrepancy) so that it flanges with the original file, thereby taking it out of the ‘past’ and placing it in the ‘present’.
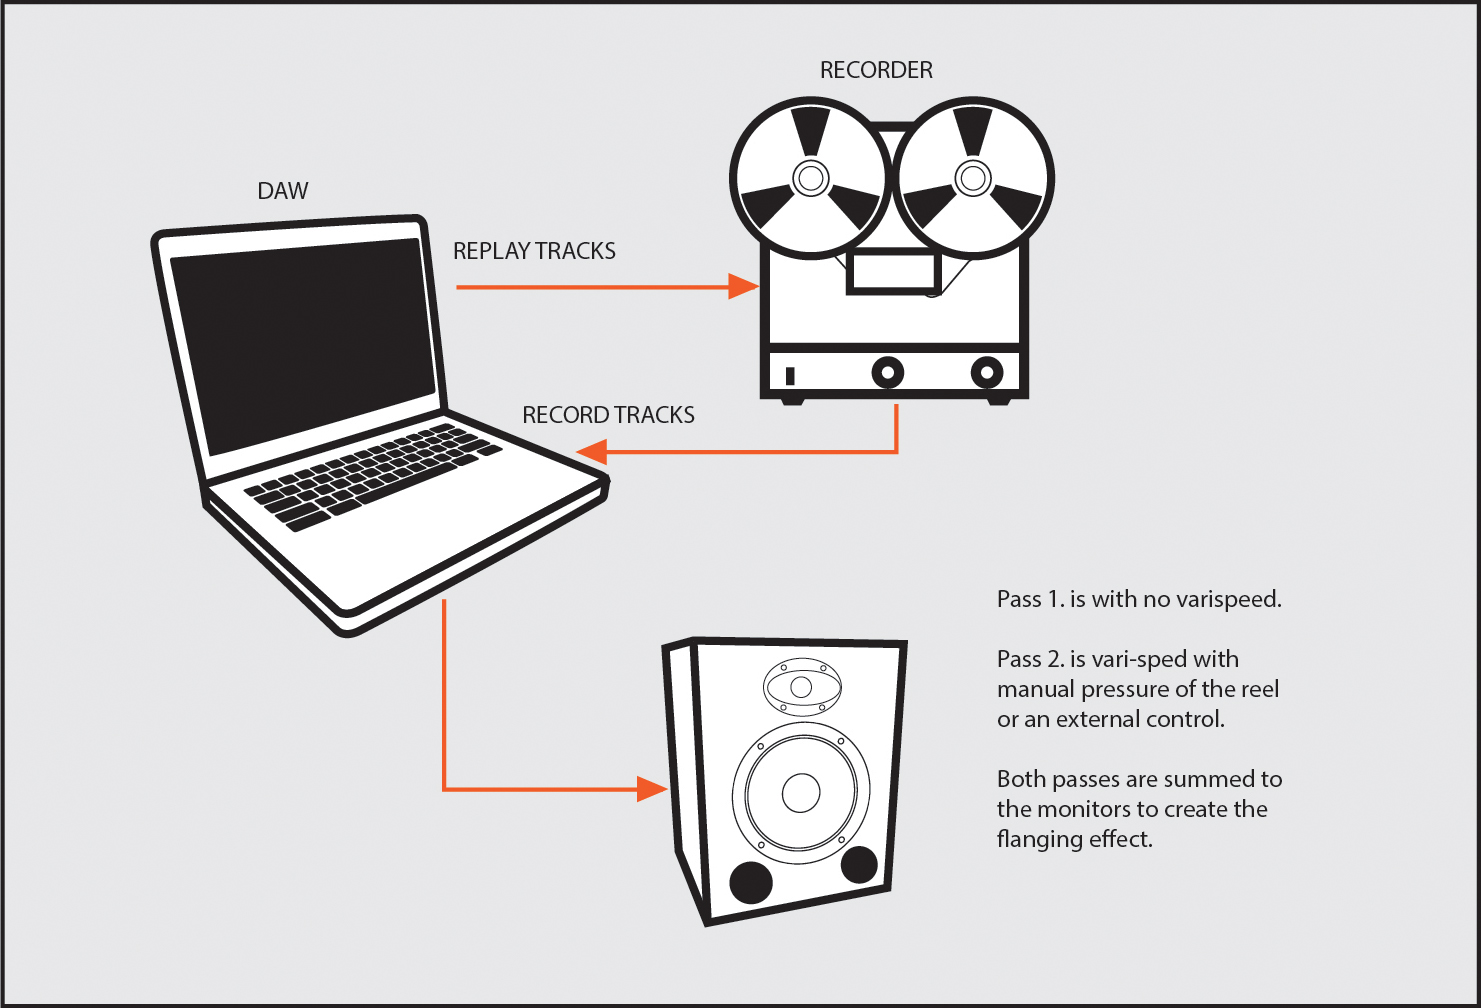
DIAGRAM C – THE SECOND SETUP
Step 1: Send the mix (or whatever it is you want to flange) to the tape recorder while monitoring off tape. Record it back into the DAW and route this newly recorded signal to your monitoring.
Step 2: Next, create a new record track (also routed to the monitors) and while monitoring the previous pass at the same time, print through the tape recorder again… this time with subtle vari-speed changes or a gently applied finger on the supply reel or capstan. Modulate the tape speed. You will now hear the new tape pass flanging with the previous one you recorded moments earlier. With practice, you can find the zero point then manipulate the speed to move the comb frequencies in the direction you want – up or down in pitch depending on what the music inspires in you. Now you’re really flying! Amaze yourself and anyone nearby with the depth, lushness and absolute freakiness of the sound!
Once you’ve recorded a suitably mind-bending flange pass, you’ll need to realign it with the track and mix it back into the song.

REALIGNING THE PASS
Readers who use a tape recorder for recording as part of their DAW setup will be familiar with realigning tape passes, correcting the time it takes a point on the tape to travel from the record head to the repro head.
Calculate the delay in samples like this: Simultaneously record something with a sharp wavefront (a blast of tone for instance) onto two DAW tracks: one track sourced directly, the other ‘off tape’ via the tape recorder. (Switch one channel of the recorder to ‘input’ if you like, same thing… make sure the vari-speed is off.) Once recorded – and zooming into the waveform as far as you can – mark the start of the waveform on each track and measure the difference between them in samples.
This number of samples can henceforth be considered the off-tape delay offset for your brand and model of machine at this tape speed. You can now nudge the previously vari-sped flange pass back along the timeline by this amount and then route it back into the mix.
Now all you have to do is fade it in and out as appropriate and find the level that gives a deep 50/50 mix of dry and ‘effected’ sound. If you’ve measured carefully and accurately, the effect you’ll now hear will sound exactly the same as the one you heard when flanging to the first constant-speed tape pass, which can now be hidden, deleted or used for further flange passes.
Some other possibilities include dual flangers, cross-fed flangers (flanging the flange) out of phase flangers and panning flangers…it’s wide-open territory.
This system is a great way to get a bit more out of your tape machine. It’s good fun, sounds fantastic and gets you up out of your chair, away from that evil screen and calls upon the deft use of your hands, ears and creative sensibilities, all the while recreating one of the classic tape effects.


‘Unlike digital or DSP-based flangers, only tape flanging can achieve this, though I’m happy to be contradicted by a digital enthusiast who can figure out how to do it.
The delay of a digital flanger cannot, of course, slow down, speed back up, reduce to zero and then move into the ‘future’, ahead of the signal coming off the DAW…’ There are now a number of DSP flanger pedals that do this: Mr Black TunnelWorm and Sheperd’s End, Catalinbread Zero Point, Strymon Deco etc. How? By putting a slight, unnoticeable delay (less than 5ms) on the ‘dry’ signal so that the modulated line can come before it.